ASP.NET 2.0 引入 FileUpload 控制項,簡化檔案上傳開發。本文建立完整教學專案結構,示範單檔上傳、伺服器儲存路徑管理、檔案類型驗證、與資料庫路徑欄位關聯,為後續二進位資料 CRUD 奠基。
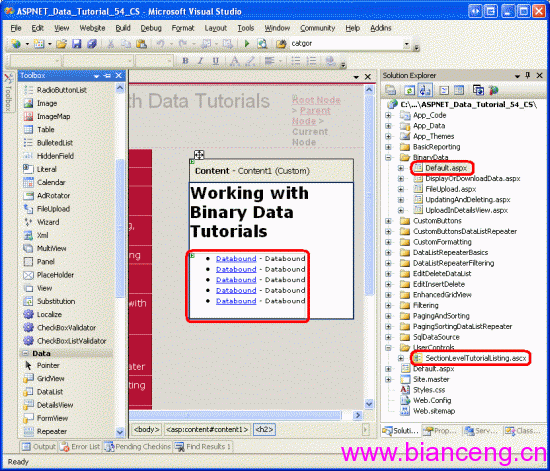
WebApp/
├── BinaryData/                 # 本教學區資料夾
│   ├── Default.aspx            # 區首頁 (含 SectionLevelTutorialListing)
│   ├── FileUpload.aspx         # 基礎上傳示範
│   ├── DisplayOrDownload.aspx  # 顯示/下載二進位資料
│   ├── UploadInDetailsView.aspx# DetailsView 整合上傳
│   └── UpdatingAndDeleting.aspx# 編輯刪除二進位資料
├── App_Data/                   # 資料庫檔案 (Northwind.mdf)
├── Brochures/                  # 小冊子實體檔案目錄 (需寫入權限)
└── Images/                     # 通用圖片目錄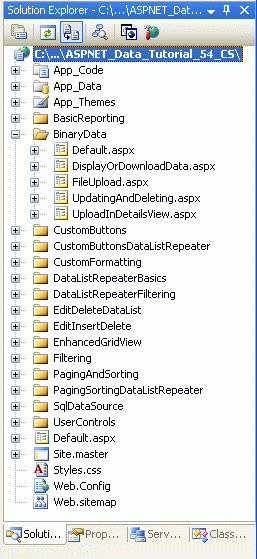
<%@ Page Language="C#" MasterPageFile="~/Site.master" %>
<asp:Content ID="Content1" ContentPlaceHolderID="MainContent" runat="server">

<h2>檔案上傳基礎示範</h2>

<asp:FileUpload ID="fuFile" runat="server" />
<asp:Button ID="btnUpload" runat="server" Text="上傳" OnClick="btnUpload_Click" />
<br />

<asp:Label ID="lblStatus" runat="server" ForeColor="Green" />
<asp:Label ID="lblError" runat="server" ForeColor="Red" Visible="false" />

</asp:Content>
protected void btnUpload_Click(object sender, EventArgs e)
{
if (!fuFile.HasFile)
{
lblError.Text = "請選擇檔案";
lblError.Visible = true;
return;
}
// 1. 驗證副檔名
string ext = Path.GetExtension(fuFile.FileName).ToLower();
string[] allowed = { ".jpg", ".jpeg", ".png", ".gif", ".pdf", ".doc", ".docx" };
if (!allowed.Contains(ext))
{
lblError.Text = $"不支援的檔案類型:{ext}";
lblError.Visible = true;
return;
}
// 2. 驗證大小 (2MB)
if (fuFile.FileBytes.Length > 2 * 1024 * 1024)
{
lblError.Text = "檔案不可超過 2MB";
lblError.Visible = true;
return;
}
// 3. 產生唯一檔名 (Guid + 原副檔名)
string fileName = Guid.NewGuid().ToString("N") + ext;
string savePath = Server.MapPath("~/Uploads/") + fileName;
// 4. 確保目錄存在
string dir = Path.GetDirectoryName(savePath);
if (!Directory.Exists(dir)) Directory.CreateDirectory(dir);
// 5. 儲存
try
{
fuFile.SaveAs(savePath);
lblStatus.Text = $"上傳成功:{fileName} ({fuFile.FileBytes.Length:N0} bytes)";
// 6. 記錄至資料庫 (此處略)
// INSERT INTO Documents (FileName, FilePath, ContentType, Size, UploadDate) VALUES (...)
}
catch (Exception ex)
{
lblError.Text = "儲存失敗:" + ex.Message;
lblError.Visible = true;
}
}<system.web>
<httpRuntime maxRequestLength="20480" executionTimeout="120" /> <!-- 20MB, 2分鐘 -->
</system.web>
<system.webServer>
<security>
<requestFiltering>
<requestLimits maxAllowedContentLength="20971520" /> <!-- 20MB Bytes -->
</requestFiltering>
</security>
</system.webServer>IIS_IUSRS、NETWORK SERVICE) 需具備 ~/Uploads/、~/Brochures/ 目錄的 讀取/寫入/修改 權限。web.config 禁用腳本執行:<configuration>
<system.webServer>
<handlers>
<clear />
<add name="StaticFile" path="*" verb="*" type="System.Web.StaticFileHandler" resourceType="File" requireAccess="Read" />
</handlers>
</system.webServer>
</configuration>Categories 擴充欄位:
ALTER TABLE Categories ADD BrochurePath NVARCHAR(255) NULL; -- PDF 路徑
-- Picture 欄位已存在 (varbinary/image),存圖片二進位
通用文件表設計:
CREATE TABLE Documents (
    DocID INT IDENTITY PRIMARY KEY,
    FileName NVARCHAR(255) NOT NULL,
    StoredFileName NVARCHAR(255) NOT NULL, -- Guid 命名
    FilePath NVARCHAR(500) NOT NULL,       -- 相對路徑 ~/Uploads/xxx.pdf
    ContentType NVARCHAR(100),
    FileSize BIGINT,
    UploadDate DATETIME DEFAULT GETDATE(),
    UploadedBy NVARCHAR(100),
    CategoryID INT NULL FOREIGN KEY REFERENCES Categories(CategoryID)
);| 現象 | 原因 | 解決 |
|---|---|---|
| 上傳大檔案失敗、無錯誤 | maxRequestLength / maxAllowedContentLength 過小 | 調整 Web.config、IIS 設定 |
| 存取被拒絕 (Access Denied) | 目錄權限不足 | 授予 IIS_IUSRS 寫入權限 |
| 檔案名稱亂碼 | 瀏覽器編碼不一、Path.GetFileName 截取完整路徑 | 使用 Guid 命名、Path.GetFileName 僅取檔名 |
| 圖片上傳後無法顯示 | Content-Type 錯誤、輸出未設定 Response.ContentType | 驗證副檔名對應 MIME、圖片輸出端點設正確 ContentType |
FileUpload 控制項提供基礎上傳功能,生產級應用需補強:驗證 (型別/大小/內容)、命名策略 (Guid/雜湊)、權限隔離 (目錄外/禁用執行)、資料庫關聯 (中繼資料)、大檔案支援 (分塊/雲端直傳)。後續教學將展示 DetailsView 整合、編輯刪除、二進位顯示完整流程。