JSP 自定義標籤將 Java 代碼從頁面剝離,封裝為可復用的 XML 風格標籤,實現邏輯與展現分離,顯著提升頁面可維護性與團隊協作效率。
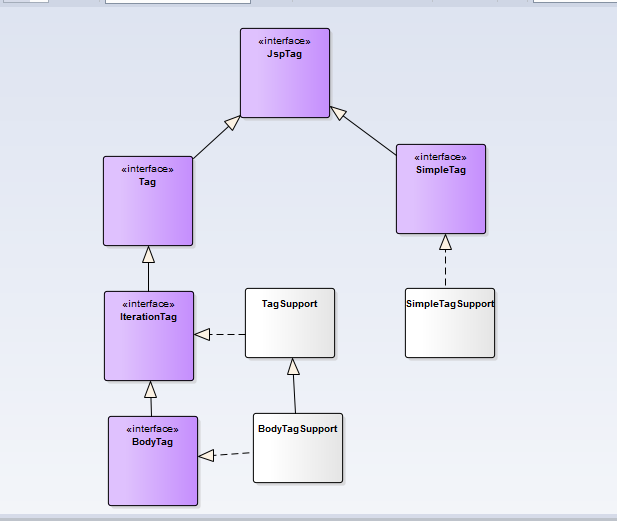
doAfterBody() 支援迭代setBodyContent() 操作標籤體內容輸出固定文本「Hello Tag」
public class HelloTag implements Tag {
    private PageContext pageContext;
    private Tag parent;

    public void setPageContext(PageContext pc) { this.pageContext = pc; }
    public void setParent(Tag t) { this.parent = t; }
    public Tag getParent() { return parent; }

    public int doStartTag() throws JspException {
        return SKIP_BODY; // 無標籤體內容
    }

    public int doEndTag() throws JspException {
        try {
            pageContext.getOut().print("Hello Tag");
        } catch (IOException e) { throw new JspException(e); }
        return SKIP_PAGE;
    }

    public void release() { /* 釋放資源 */ }
}
TLD 配置 (/WEB-INF/tlds/CustomTaglib.tld):
<tag>
    <name>hello</name>
    <tag-class>com.lp.tags.HelloTag</tag-class>
    <body-content>empty</body-content> <!-- 無標籤體 -->
</tag>
JSP 使用:
<%@ taglib uri="/WEB-INF/tlds/CustomTaglib.tld" prefix="hello" %>
<hello:hello></hello:hello>

實現加法計算器 <add:add num1="3" num2="5"></add:add> 輸出 8
public class AddTag extends TagSupport {
    private int num1, num2;
    // Getter/Setter 必須提供,容器自動注入屬性值
    public void setNum1(int num1) { this.num1 = num1; }
    public void setNum2(int num2) { this.num2 = num2; }

    public int doEndTag() throws JspException {
        try {
            pageContext.getOut().print(num1 + num2);
        } catch (IOException e) { throw new JspException(e); }
        return EVAL_PAGE; // 繼續執行頁面其餘部分
    }
}
TLD 屬性聲明:
<tag>
    <name>add</name>
    <tag-class>com.lp.tags.AddTag</tag-class>
    <attribute>
        <name>num1</name>
        <required>true</required>
        <rtexprvalue>true</rtexprvalue> <!-- 支援運行時表達式 -->
    </attribute>
    <attribute>
        <name>num2</name>
        <required>true</required>
        <rtexprvalue>true</rtexprvalue>
    </attribute>
</tag>

模擬 Java switch-case-default 邏輯,展示父子標籤通信機制
父標籤 SwitchTag:維護子標籤執行狀態標記
public class SwitchTag extends TagSupport {
    private boolean childExecuted = false; // 是否有子標籤已匹配

    public int doStartTag() {
        childExecuted = false;
        return EVAL_BODY_INCLUDE; // 執行標籤體(即 case/default 標籤)
    }

    // 供子標籤調用:檢查是否可執行
    public synchronized boolean canExecute() { return !childExecuted; }
    // 供子標籤調用:宣告已有匹配
    public synchronized void markExecuted() { childExecuted = true; }

    public void release() { childExecuted = false; }
}
子標籤 CaseTag:條件滿足時執行體並通知父標籤
public class CaseTag extends TagSupport {
    private boolean condition;
    public void setCondition(boolean condition) { this.condition = condition; }

    public int doStartTag() throws JspException {
        SwitchTag parent = (SwitchTag) getParent();
        if (!parent.canExecute()) return SKIP_BODY; // 已有匹配,跳過

        if (condition) {
            parent.markExecuted(); // 宣告匹配成功
            return EVAL_BODY_INCLUDE; // 執行標籤體
        }
        return SKIP_BODY; // 條件不滿足,跳過
    }
    public void release() { condition = false; }
}
子標籤 DefaultTag:無條件執行,但前提是無 case 匹配
public class DefaultTag extends TagSupport {
    public int doStartTag() throws JspException {
        SwitchTag parent = (SwitchTag) getParent();
        if (!parent.canExecute()) return SKIP_BODY;
        parent.markExecuted();
        return EVAL_BODY_INCLUDE;
    }
}
TLD 配置(注意 body-content>jsp</body-content> 支援標籤體內 JSP 腳本):
<tag><name>switch</name><tag-class>com.lp.tags.SwitchTag</tag-class><body-content>jsp</body-content></tag>
<tag><name>case</name><tag-class>com.lp.tags.CaseTag</tag-class><body-content>jsp</body-content>
    <attribute><name>cond</name><required>true</required><rtexprvalue>true</rtexprvalue></attribute>
</tag>
<tag><name>default</name><tag-class>com.lp.tags.DefaultTag</tag-class><body-content>jsp</body-content></tag>
JSP 使用:
<mytag:switch>
    <mytag:case cond='<%=userName.equals("zhangsan")%>'><%out.print("張三");%></mytag:case>
    <mytag:case cond='<%=userName.equals("lisi")%>'><%out.print("李四");%></mytag:case>
    <mytag:case cond='<%=userName.equals("wangwu")%>'><%out.print("王五");%></mytag:case>
    <mytag:default><%out.print("無");%></mytag:default>
</mytag:switch>

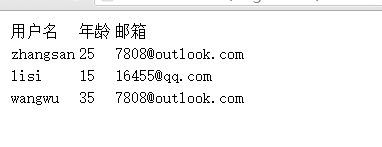
實現 <iterate:iterate items="${userList}" var="user"> 遍歷集合輸出表格
public class IterateTag extends TagSupport {
    private Iterator<?> iterator;
    private String var; // 頁面變量名
    private Object currentItem;

    public void setItems(Collection<?> coll) {
        if (coll != null && !coll.isEmpty()) iterator = coll.iterator();
    }
    public void setVar(String var) { this.var = var; }

    public int doStartTag() throws JspException {
        if (iterator == null || !iterator.hasNext()) return SKIP_BODY;
        currentItem = iterator.next();
        exposeToPage(); // 存入 pageContext
        return EVAL_BODY_INCLUDE;
    }

    public int doAfterBody() throws JspException {
        if (iterator.hasNext()) {
            currentItem = iterator.next();
            exposeToPage();
            return EVAL_BODY_AGAIN; // 重新執行標籤體
        }
        return SKIP_BODY; // 結束迭代
    }

    private void exposeToPage() {
        if (currentItem == null) pageContext.removeAttribute(var, PageContext.PAGE_SCOPE);
        else pageContext.setAttribute(var, currentItem, PageContext.PAGE_SCOPE);
    }
    public void release() { iterator = null; currentItem = null; }
}
JSP 使用:
<% ArrayList<UserBean> list = ...; %>
<table>
    <tr><td>用戶名</td><td>年齡</td><td>郵箱</td></tr>
    <iterate:iterate items="<%=list%>" var="user">
        <jsp:useBean id="user" class="com.lp.beans.UserBean"/>
        <tr>
            <td><jsp:getProperty property="userName" name="user"/></td>
            <td>${user.age}</td>
            <td>${user["email"]}</td>
        </tr>
    </iterate:iterate>
</table>
核心方法:
setJspContext(JspContext):設置上下文(PageContext 父類)setParent(JspTag) / getParent():父子關係setJspBody(JspFragment):接收標籤體片段,可多次調用 invoke()doTag():單一入口處理所有邏輯,替代 doStartTag/doEndTag/doAfterBodypublic class WelcomeSimpleTag extends SimpleTagSupport {
private String name;
private JspFragment body;
public void setName(String name) { this.name = name; }
public void setJspBody(JspFragment body) { this.body = body; }
public void doTag() throws JspException, IOException {
JspWriter out = getJspContext().getOut();
out.print("Welcome, " + name + "! ");
if (body != null) body.invoke(null); // 執行標籤體
}
}
| 場景 | 推薦方案 | 理由 |
|---|---|---|
| 簡單輸出、工具標籤 | SimpleTagSupport | 代碼最少,單一 doTag() 入口 |
| 需操作標籤體內容(如模板替換) | BodyTagSupport | 可獲取 BodyContent 讀寫標籤體 |
| 複雜迭代、條件控制 | IterationTag / TagSupport | 精細控制 doStartTag/doAfterBody/doEndTag |
| 父子標籤協作 | TagSupport 系統 | getParent() 類型轉換調用父方法 |
| 現有 Tag 遷移 | 保持原模式 | 避免重構風險 |
rtexprvalue=true 支援 EL 表達式empty/scriptless/tagdependent/jspsynchronizedc:forEach、c:if、fmt:formatNumber 等),僅在無法滿足時自定義