承接上篇測試代碼,本文將深入剖析簡易 IOC 容器的核心實現:從自定義註解定義、掃描機制、Bean 生命周期管理,到循環依賴的三級緩存解決方案。雖然代碼量不大,但麻雀雖小、五臟俱全,是理解 Spring IOC 核心原理的最佳切入點。
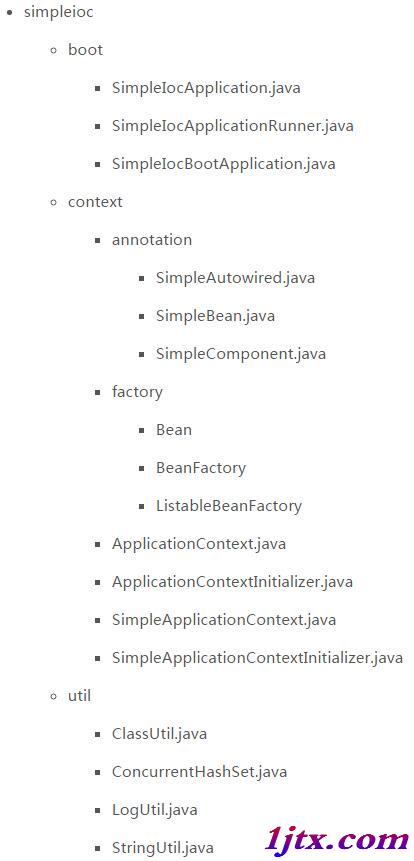
核心模組集中在 context、boot、annotation 三個包,完整代碼見 GitHub。
@Target(ElementType.FIELD) @Retention(RetentionPolicy.RUNTIME) @Documented
public @interface SimpleAutowired {
    boolean required() default true;
    String value() default ""; // Bean 名稱,對應 @Qualifier
}
僅作用於欄位,融合 @Autowired + @Qualifier,簡化實現複雜度。
@Target({ElementType.METHOD, ElementType.ANNOTATION_TYPE}) @Retention(RetentionPolicy.RUNTIME) @Documented
public @interface SimpleBean { String value() default ""; }
對應 Spring @Bean,方法回傳值即為 Bean 實例,value 指定 Bean 名稱。
@Target(ElementType.TYPE) @Retention(RetentionPolicy.RUNTIME) @Documented
public @interface SimpleComponent { String value() default ""; }
標記類為組件掃描目標,**要求類必須有無參構造函數**,否則無法實例化。
@Target(ElementType.TYPE) @Retention(RetentionPolicy.RUNTIME) @Documented
public @interface SimpleIocBootApplication { String[] basePackages() default {}; }
指定掃描基礎包,未配置時預設掃描啟動類所在包及子包。
public class SimpleIocApplication {
    public static void run(Class entryClass, String[] args) {
        new SimpleIocApplication(entryClass).run(args);
    }
    private void run(String[] args) {
        // 1. 建立 ApplicationContext
        SimpleApplicationContext ctx = new SimpleApplicationContext();
        // 2. 解析基礎包,建立初始化器
        ApplicationContextInitializer initializer = createInitializer(entryClass);
        // 3. 初始化上下文(掃描、實例化、裝配)
        initializer.initialize(ctx);
        // 4. 處理特殊 Bean(如 ApplicationRunner)
        processSpecialBeans(ctx, args);
    }
    private void processSpecialBeans(SimpleApplicationContext ctx, String[] args) {
        Map runners = ctx.getBeansOfType(SimpleIocApplicationRunner.class);
        runners.values().forEach(r -> { try { r.run(args); } catch (Exception e) { throw new RuntimeException(e); } });
    }
    // ... 省略輔助方法
} 這是容器的心臟,維護四大集合:
registeredBeans:已完成裝配的 BeanearlyBeans:已實例化但未完成裝配的 Bean(用於解決循環依賴)scannedPackages:已掃描包集合,防重複totalBeanCount:Bean 計數器,生成唯一名稱用public void scan(Set basePackages, boolean recursively) {
ClassLoader cl = Thread.currentThread().getContextClassLoader();
Set> classes = new LinkedHashSet<>();
for (String pkg : basePackages) {
if (scannedPackages.add(pkg)) {
classes.addAll(ClassUtil.getClassesByPackageName(cl, pkg, recursively));
}
}
// 1. 處理每個類,嘗試創建 Bean
classes.forEach(this::processSingleClass);
// 2. 統一處理早期 Bean,完成循環依賴裝配
processEarlyBeans();
} private void processSingleClass(Class clazz) {
if (!clazz.isAnnotationPresent(SimpleComponent.class)) return;
Object instance = clazz.newInstance(); // 需無參構造
SimpleComponent ann = clazz.getAnnotation(SimpleComponent.class);
String beanName = ann.value().isEmpty() ? generateUniqueName(clazz) : ann.value();
// 嘗試裝配欄位
boolean wired = autowireFields(instance, clazz, false);
if (wired) registeredBeans.put(beanName, new Bean(instance, clazz));
else earlyBeans.put(beanName, new Bean(instance, clazz));
// 處理 @Bean 方法
createBeansByMethodsOfClass(instance, clazz);
}private boolean autowireFields(Object instance, Class clazz, boolean lastChance) throws IllegalAccessException {
for (Field field : clazz.getDeclaredFields()) {
SimpleAutowired ann = field.getAnnotation(SimpleAutowired.class);
if (ann == null) continue;
String name = ann.value();
Bean target = getBeanByNameOrType(name, field.getType(), true); // 允許從 earlyBeans 獲取
if (target == null) {
if (lastChance) {
if (!ann.required()) continue;
throw new RuntimeException("Autowire failed: " + clazz.getName() + "." + field.getName());
}
return false; // 第一次裝配失敗,放入 earlyBeans 等待第二輪
}
field.setAccessible(true);
field.set(instance, target.getObject());
}
return true;
}private synchronized void processEarlyBeans() {
for (Map.Entry entry : earlyBeans.entrySet()) {
Bean bean = entry.getValue();
if (autowireFields(bean.getObject(), bean.getClazz(), true)) { // lastChance=true
registeredBeans.put(entry.getKey(), bean);
earlyBeans.remove(entry.getKey());
}
}
} 這裡實現了類似 Spring 的「三級緩存」思想:實例化 → 放入 earlyBeans → 暴露早期引用 → 完成裝配 → 遷移至 registeredBeans,優雅解決 BeanA ↔ BeanB 循環依賴。
private void createBeansByMethodsOfClass(Object instance, Class clazz) {
    for (Method m : getMethodsWithAnnotation(clazz, SimpleBean.class)) {
        m.setAccessible(true);
        Object beanObj = m.invoke(instance);
        SimpleBean ann = m.getAnnotation(SimpleBean.class);
        String name = ann.value().isEmpty() ? generateUniqueName(beanObj.getClass()) : ann.value();
        registeredBeans.put(name, new Bean(beanObj, beanObj.getClass()));
    }
}| 優點 | 缺點 |
|---|---|
| 代碼精簡(<500 行),核心邏輯清晰易懂 | 功能極簡,無 AOP、事務、生命周期回調等企業級特性 |
| 支援 @Component/@Autowired/@Bean 核心註解 | 無參構造限制、無條件裝配、無作用域控制 |
| 含循環依賴解決方案,適合教學與微型專案 | 非生產級,生產環境請直接用 Spring Boot |
完整代碼:simple-ioc。若需更強大功能,請轉向 Spring Boot 官方生態。