在上一篇文章中,我們梳理了 MVC 架構的設計思路。本文將通過一個完整的學生管理登錄/註冊案例,詳細演示如何從零開始搭建一個輕量級的 MVC 框架,涵蓋數據庫設計、實體類、DAO 層、Service 層、Action 處理器、配置文件解析、過濾器攔截以及視圖跳轉等核心環節。
首先建立測試用的 STUDENT 表及序列,並初始化幾條測試數據:
create table STUDENT (
  sid NUMBER primary key,
  sname VARCHAR2(20),
  age NUMBER,
  pwd VARCHAR2(20)
);
create sequence seq_student;

insert into STUDENT (sid, sname, age, pwd) values (seq_student.nextval, 'holly', 18, '123');
insert into STUDENT (sid, sname, age, pwd) values (seq_student.nextval, '錢濤', 108, '123');
insert into STUDENT (sid, sname, age, pwd) values (seq_student.nextval, '張睿', 10, '123');
insert into STUDENT (sid, sname, age, pwd) values (seq_student.nextval, '修地', 16, '123');
commit;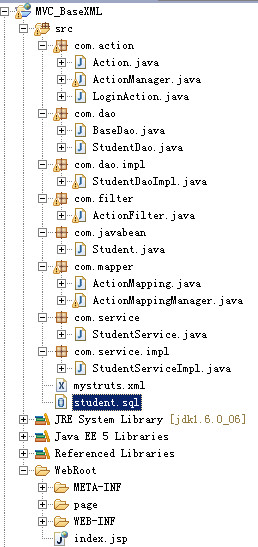
項目結構說明: 在 WebRoot/WEB-INF/lib 下需放入 dom4j-1.6.1.jar(XML 解析)和 ojdbc14.jar(Oracle 驅動)。
標準 JavaBean,包含 sid、sname、pwd、age 四個屬性及其 Getter/Setter、構造方法。
package com.javabean;
public class Student {
    private int sid;
    private String sname;
    private String pwd;
    private int age;
    // 省略構造方法、Getter/Setter...
}封裝了驅動加載、獲取連接、通用查詢 (executeQuery)、通用增刪改 (executeUpdate) 及資源關閉 (closeAll) 邏輯。使用靜態代碼塊加載驅動,採用 PreparedStatement 防止 SQL 注入。
public class BaseDao {
    private static final String driver = "oracle.jdbc.driver.OracleDriver";
    private static final String url = "jdbc:oracle:thin:@127.0.0.1:1521:orcl";
    private static final String user = "holly";
    private static final String password = "sys";
    // 連接對象、通用查詢/更新方法、closeAll()...
}public interface StudentDao {
Student getByNameAndPwd(String sname, String pwd);
}繼承 BaseDao,實現具體 SQL 查詢並將 ResultSet 映射為 Student 對象。
public class StudentDaoImpl extends BaseDao implements StudentDao {
    public Student getByNameAndPwd(String sname, String pwd) {
        String sql = "select * from student where sname=? and pwd=?";
        Object[] param = {sname, pwd};
        rs = this.executeQuery(sql, param);
        // 映射邏輯...
    }
}public interface StudentService {
Student loginUser(String name, String pwd);
}調用 DAO 層完成登錄驗證。
public class StudentServiceImpl implements StudentService {
    StudentDao dao = new StudentDaoImpl();
    public Student loginUser(String name, String pwd) {
        return dao.getByNameAndPwd(name, pwd);
    }
}自定義 DTD 定義 <action>、<result> 結構,配置 login 和 register 兩個動作及其成功/失敗跳轉頁面。
<action name="login" class="com.action.LoginAction">
  <result name="success">page/index.jsp</result>
  <result name="input">page/login.jsp</result>
</action>public interface Action {
String execute(HttpServletRequest request, HttpServletResponse response) throws Exception;
}處理編碼、獲取參數、調用 Service、判斷結果並返回視圖邏輯名 (success/input)。
public class LoginAction implements Action {
    public String execute(HttpServletRequest request, HttpServletResponse response) throws Exception {
        request.setCharacterEncoding("UTF-8");
        String name = request.getParameter("user");
        String pwd = request.getParameter("pwd");
        StudentService service = new StudentServiceImpl();
        Student stu = service.loginUser(name, pwd);
        if (stu != null) {
            request.getSession().setAttribute("stu", stu);
            return "success";
        }
        return "input";
    }
}封裝 name、className 及 resultMap (key: result-name, value: 跳轉路徑)。
使用 dom4j 解析 XML,將所有 <action> 節點轉換為 ActionMapping 對象存入靜態 Map<String, ActionMapping>,提供 getActionMappingByName 查詢。
public void init(String configureFileName) {
    InputStream is = this.getClass().getResourceAsStream("/" + configureFileName);
    Document doc = new SAXReader().read(is);
    Element root = doc.getRootElement();
    // 遍歷 actions -> action -> result,構建映射...
}利用反射 (Class.forName().newInstance()) 動態創建 Action 實例。
實現 Filter 接口,init() 讀取 web.xml 初始化參數啟動 ActionMappingManager;doFilter() 核心流程:
login.action → login)。ActionMappingManager 獲取對應 ActionMapping。ActionManager 反射創建 Action 實例並調用 execute()。sendRedirect 跳轉。配置 ActionFilter 攔截所有 *.action 請求,指定配置文件為 mystruts.xml。
<filter>
  <filter-name>requestFilter</filter-name>
  <filter-class>com.filter.ActionFilter</filter-class>
  <init-param>
    <param-name>config</param-name>
    <param-value>mystruts.xml</param-value>
  </init-param>
</filter>
<filter-mapping>
  <filter-name>requestFilter</filter-name>
  <url-pattern>*.action</url-pattern>
</filter-mapping>簡單的登錄表單提交到 login.action,首頁通過 EL 表達式 ${stu.sname} 顯示歡迎信息。
至此,一個包含「配置文件驅動、反射實例化、過濾器攔截、分層解耦」核心特性的微型 MVC 框架已搭建完成。部署到 Tomcat,訪問 https://localhost:8080/項目名/ 即可看到登錄頁,輸入數據庫中的用戶名/密碼 (如 holly/123) 即可跳轉至歡迎頁。
這個框架雖然簡單,但展現了 Struts 1.x 時代框架的核心設計思想,是理解現代 MVC 框架(如 Spring MVC)底層原理的絕佳入門實踐。