當單庫資料量過大導致效能瓶頸時,分庫(Sharding)是常見解決方案。Spring 提供 AbstractRoutingDataSource 讓我們以極低成本實現動態資料源切換。本文完整示範:基於用戶 ID 取模路由、ThreadLocal 上下文傳遞、Spring XML/JavaConfig 配置、MyBatis 整合、註解驅動自動切換兩種模式。
public class RoutingDataSource extends AbstractRoutingDataSource {
    @Override
    protected Object determineCurrentLookupKey() {
        return DBContext.getDBKey(); // 從 ThreadLocal 獲取當前資料源鍵
    }
}public class DBContext {
private static final int DB_COUNT = 2; // 資料庫數量
private static final ThreadLocal<String> tlDbKey = new ThreadLocal<>();
public static String getDBKey() { return tlDbKey.get(); }
public static void setDBKey(String key) { tlDbKey.set(key); }
public static void clear() { tlDbKey.remove(); }
// 根據用戶 ID 取模決定資料源
public static String getDBKeyByUserId(int userId) {
int idx = userId % DB_COUNT;
return "db_" + (idx + 1); // db_1, db_2
}
}jdbc.driver=com.mysql.jdbc.Driver
jdbc.key-1=db_1
jdbc.url-1=jdbc:mysql://localhost:3306/db_1?useUnicode=true&characterEncoding=utf8
jdbc.user-1=test
jdbc.password-1=123456
jdbc.key-2=db_2
jdbc.url-2=jdbc:mysql://localhost:3306/db_2?useUnicode=true&characterEncoding=utf8
jdbc.user-2=test
jdbc.password-2=123456<bean id="parentDataSource" class="com.alibaba.druid.pool.DruidDataSource" init-method="init" destroy-method="close">
<property name="driverClassName" value="${jdbc.driver}"/>
<property name="filters" value="stat"/>
<property name="maxActive" value="20"/>
<!-- 其它連線池參數 -->
</bean>
<bean id="dataSource1" parent="parentDataSource">
<property name="url" value="${jdbc.url-1}"/>
<property name="username" value="${jdbc.user-1}"/>
<property name="password" value="${jdbc.password-1}"/>
</bean>
<bean id="dataSource2" parent="parentDataSource">
<property name="url" value="${jdbc.url-2}"/>
<property name="username" value="${jdbc.user-2}"/>
<property name="password" value="${jdbc.password-2}"/>
</bean>
<!-- 路由資料源:核心 -->
<bean id="dataSource" class="com.example.utils.RoutingDataSource">
<property name="targetDataSources">
<map key-type="java.lang.String">
<entry key="${jdbc.key-1}" value-ref="dataSource1"/>
<entry key="${jdbc.key-2}" value-ref="dataSource2"/>
</map>
</property>
<property name="defaultTargetDataSource" ref="dataSource1"/> <!-- 可選預設 -->
</bean>
<bean id="sqlSessionFactory" class="org.mybatis.spring.SqlSessionFactoryBean">
<property name="dataSource" ref="dataSource"/>
<property name="mapperLocations" value="classpath:mybatis/*.xml"/>
</bean>@Service
public class UserServiceImpl implements UserService {
@Autowired UserEntityMapper userEntityMapper;
@Override
public void addUser(UserEntity user) {
DBContext.setDBKey(DBContext.getDBKeyByUserId(user.getUserId()));
try {
userEntityMapper.insertSelective(user);
} finally {
DBContext.clear(); // 防止 ThreadLocal 洩漏
}
}
@Override
public UserEntity getUser(int userId) {
DBContext.setDBKey(DBContext.getDBKeyByUserId(userId));
try {
return userEntityMapper.selectByPrimaryKey(userId);
} finally {
DBContext.clear();
}
}
}新增第三個資料源 db_main(如訂單庫),為特定 Mapper 綁定專屬 SqlSessionFactory,無需手動切換。
<bean id="dataSourceMain" parent="parentDataSource">
    <property name="url" value="${jdbc.url-main}"/>
    <property name="username" value="${jdbc.user-main}"/>
    <property name="password" value="${jdbc.password-main}"/>
</bean>

<bean id="sqlSessionFactoryMain" class="org.mybatis.spring.SqlSessionFactoryBean">
    <property name="dataSource" ref="dataSourceMain"/>
    <property name="mapperLocations" value="classpath:mybatis/order/*.xml"/>
</bean>

<bean id="orderScanner" class="org.mybatis.spring.mapper.MapperScannerConfigurer">
    <property name="basePackage" value="com.example.mapper.order"/>
    <property name="sqlSessionFactoryBeanName" value="sqlSessionFactoryMain"/>
</bean>@Resource(name = "orderScanner")
public interface OrderEntityMapper extends Mapper<OrderEntity> { }@Autowired OrderEntityMapper orderMapper;
public void addOrder(OrderEntity order) {
orderMapper.insertSelective(order); // 自動走 db_main
}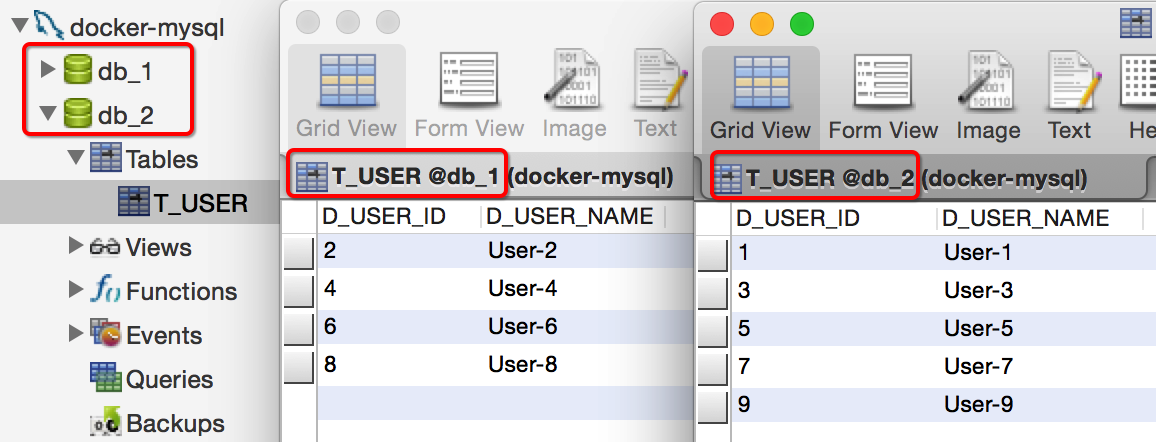
插入用戶 ID 1、2、3... 後,db_1 存單號,db_2 存雙號,分庫生效。
try-finally 或 Filter/Interceptor 在請求結束時 DBContext.clear()Spring AbstractRoutingDataSource + ThreadLocal 是實現多資料源路由的經典輕量方案,適合中小型分庫場景;大規模分庫建議使用 ShardingSphere、MyCat 等專業中間件。