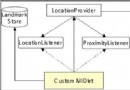
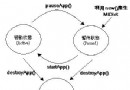
TouristUI 作為定位應用的主視圖組件,繼承 Canvas 並實現 CommandListener,負責即時渲染定位數據、地標編輯與指南針功能切換。
public class TouristUI extends Canvas implements CommandListener {
    // 狀態顯示字段
    private String providerState = "未知";
    private String proximityState = "等待中";
    private AddressInfo info;
    private QualifiedCoordinates coord;
    private float speed;

    // 功能命令
    private Command compassCmd = new Command("指南針", Command.OK, 1);
    private Command editorCmd = new Command("編輯器", Command.STOP, 1);

    // 子 UI 組件引用
    private LandmarkEditorUI editorUI;
    private CompassUI compassUI;

    public TouristUI(TouristData data) {
        editorUI = new LandmarkEditorUI(this, data);
        compassUI = new CompassUI(this);
        checkSupportedFeatures();
        addCommand(editorCmd);
        setCommandListener(this);
    }
}protected void checkSupportedFeatures() {
if (ConfigurationProvider.getInstance().isOrientationSupported()) {
addCommand(compassCmd); // 支持方向感測才啟用指南針
} else {
removeCommand(compassCmd);
}
}public void setProviderState(String state) { providerState = state; }
public void setProximityState(String state) { proximityState = state; }
public void setInfo(AddressInfo info, QualifiedCoordinates coord, float speed) {
this.info = info;
this.coord = coord;
this.speed = speed;
}
protected void paint(Graphics g) {
Font f = Font.getFont(Font.FACE_SYSTEM, Font.STYLE_PLAIN, Font.SIZE_SMALL);
g.setFont(f);
int lineHeight = f.getHeight();
int line = 0;
// 清空背景
g.setColor(0xFFFFFF);
g.fillRect(0, 0, getWidth(), getHeight());
g.setColor(0x0000FF);
// 繪製基礎狀態
g.drawString("提供者狀態: " + providerState, 0, lineHeight * line++, Graphics.LEFT | Graphics.TOP);
g.drawString("接近監測: " + proximityState, 0, lineHeight * line++, Graphics.LEFT | Graphics.TOP);
// 繪製座標與速度
if (coord != null) {
double lat = coord.getLatitude();
double lon = coord.getLongitude();
g.drawString("緯度,經度 (" + Utils.formatDouble(lat, 3) + ", " + Utils.formatDouble(lon, 3) + ")",
0, lineHeight * line++, Graphics.TOP | Graphics.LEFT);
g.drawString("速度: " + Utils.formatDouble(speed, 2) + " m/s",
0, lineHeight * line++, Graphics.TOP | Graphics.LEFT);
}
// 繪製地址資訊
if (info != null) {
g.setColor(0x000000);
drawAddressField(g, "國家", info.getField(AddressInfo.COUNTRY), lineHeight, line);
drawAddressField(g, "省/州", info.getField(AddressInfo.STATE), lineHeight, line);
drawAddressField(g, "城市", info.getField(AddressInfo.CITY), lineHeight, line);
drawAddressField(g, "街道", info.getField(AddressInfo.STREET), lineHeight, line);
drawAddressField(g, "建築物", info.getField(AddressInfo.BUILDING_NAME), lineHeight, line);
}
}
private void drawAddressField(Graphics g, String label, String value, int lineHeight, int line) {
if (value != null) {
g.drawString(label + ": " + value, 0, lineHeight * line++, Graphics.TOP | Graphics.LEFT);
}
}public void commandAction(Command command, Displayable d) {
if (command == editorCmd) {
if (coord != null) {
editorUI.showEditor(coord, LandmarkEditorUI.MODE_ADDNEW);
} else {
MessageUI.showLocationDataNotAvailable();
}
} else if (command == compassCmd) {
TouristMIDlet.getDisplay().setCurrent(compassUI);
}
}本文完整呈現了從核心 UI 實現到實際部署的完整鏈路,為 J2ME 定位應用開發提供了可直接參考的工程化範本。