參考商業組件 aspImage (ServerObjects),功能強大。本文不講使用方法,專注於如何自行實作同類組件。GDI+ 非唯一選擇,開發者可嘗試其他圖形庫。
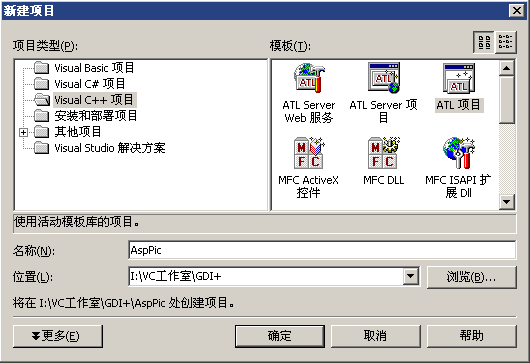
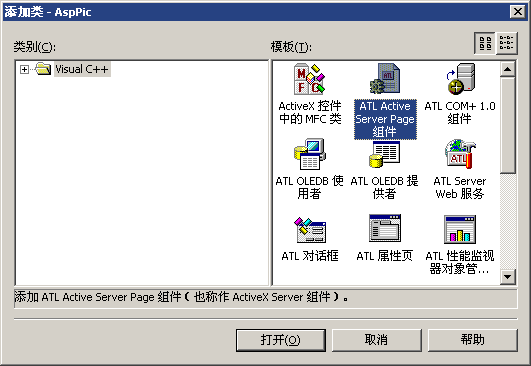
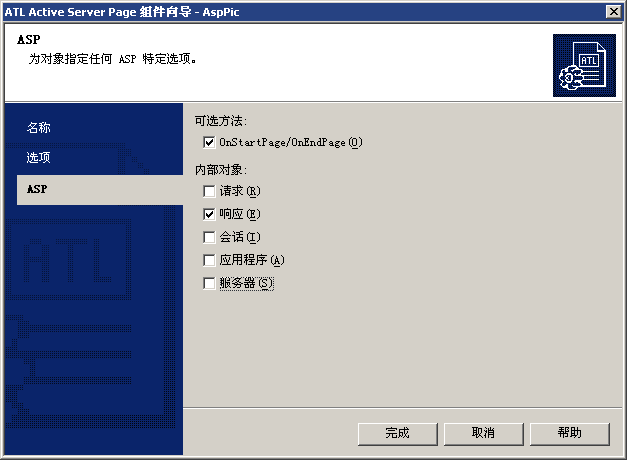
類別名:AspPicCom,勾選 Response 內建物件。
| 名稱 | 類別 | 說明 | 調用範例 |
|---|---|---|---|
| FontName | 屬性 | 字體名稱 (字串) | .FontName = "宋體" |
| FontSize | 屬性 | 字體大小 (整數) | .FontSize = 40 |
| FontStyle | 屬性 | 字體樣式 (整數旗標) | Regular=0, Bold=1, Italic=2, BoldItalic=3, Underline=4, Strikeout=8.FontStyle = 8 |
| ImgFormat | 屬性 | 輸出圖片格式 (MIME) | "image/gif", "image/jpeg", "image/bmp"....ImgFormat = "image/gif" |
| SetFontColor | 方法 | 設定字體顏色 (ARGB) | .SetFontColor 255,3,242,4 (Alpha,Red,Green,Blue) |
| SetBackColor | 方法 | 設定背景顏色 (ARGB) | .SetBackColor 255,3,242,4 |
| ShowPic | 方法 | 輸出圖片至客戶端 | .ShowPic |
#include
using namespace Gdiplus;
#pragma comment(lib, "gdiplus.lib")
ULONG_PTR gdiplusToken; // 全域或類別成員
FinalConstruct 初始化 GDI+
GdiplusStartupInput gdiplusStartupInput;
GdiplusStartup(&gdiplusToken, &gdiplusStartupInput, NULL);
FinalRelease 關閉 GDI+
GdiplusShutdown(gdiplusToken);
參考資源:MSDN GDI+、CodeProject GDI+ 專區
ShowPic 為例
// 建立 1x1 像素位圖用於測量文字範圍
Bitmap bitmap(1, 1, PixelFormat48bppRGB);
Graphics graphics(&bitmap);
USES_CONVERSION;

// 建立字體物件
Font font(OLE2CW(m_bstrFontName), (float)m_fFontSize, m_nFontStyle, UnitPoint, NULL);
PointF origin(0, 0);
StringFormat format;
format.SetAlignment(StringAlignmentCenter);
RectF boundRect;

// 測量文字實際寬高
graphics.MeasureString(OLE2CW(m_bstrText), m_bstrText.Length(), &font, origin, &format, &boundRect);
int nWidth = (int)boundRect.Width;
int nHeight = (int)boundRect.Height;

// 建立實際大小位圖
Bitmap bm(nWidth, nHeight, PixelFormat48bppRGB);
Graphics* g = Graphics::FromImage(&bm);
boundRect.Width *= 2; // 擴寬背景區域

// 填充背景
SolidBrush solidbrush(m_cBackground);
g->FillRectangle(&solidbrush, boundRect);

// 繪製文字
SolidBrush SolidFont(m_cFontColor);
PointF fPoint(0, 0);
g->DrawString(OLE2CW(m_bstrText), m_bstrText.Length(), &font, fPoint, &SolidFont);

// 取得編碼器 CLSID
int result;
CLSID pngClsid;
result = GetCodecClsid(OLE2W(m_btrImgFormat), &pngClsid);

// 建立記憶體串流
HRESULT hr;
HGLOBAL hGlobal = GlobalAlloc(GMEM_MOVEABLE, 0);
CComPtr pStm;
if (FAILED(hr = CreateStreamOnHGlobal(hGlobal, TRUE, &pStm))) return hr;

// 位圖存入串流
bm.Save(pStm, &pngClsid, NULL);

// 讀取串流資料至 SAFEARRAY
ULONG cElements = (ULONG)GlobalSize(hGlobal);
LPBYTE lpData = (LPBYTE)GlobalLock(hGlobal);
SAFEARRAY* pArray = SafeArrayCreateVector(VT_UI1, 0, cElements);
for (UINT iElement = 0; iElement < cElements; iElement++) {
  long idx = iElement;
  SafeArrayPutElement(pArray, &idx, ((LPBYTE)lpData) + iElement);
}
GlobalUnlock(hGlobal);

// 封裝為 VARIANT 並輸出
CComVariant vBytes;
vBytes.vt = VT_ARRAY | VT_UI1;
vBytes.parray = pArray;
m_piResponse->Clear();
m_piResponse->put_ContentType(m_btrImgFormat);
m_piResponse->BinaryWrite(vBytes);
m_piResponse->End();
關鍵技術點:MeasureString 精確測量、CreateStreamOnHGlobal 記憶體串流、BinaryWrite 直接輸出二進制圖片數據、Response.ContentType 設定正確 MIME。
<%@ LANGUAGE="VBSCRIPT" CODEPAGE="936" %>

<%
set Picture = Server.CreateObject("AspPic.AspPicCom")
picture.Text = "你能看見我嗎?我來自 www.goodassister.com!"
picture.FontName = "黑體"
picture.FontSize = 40
picture.ImgFormat = "image/jpeg"
picture.FontStyle = 1
Picture.SetFontColor 255,3,242,4   ' Alpha, Red, Green, Blue
Picture.SetBackColor 10,243,42,54  ' Alpha, Red, Green, Blue
Picture.ShowPic
set Picture = nothing
%>
使用前請先註冊: regsvr32 AspPic.dll
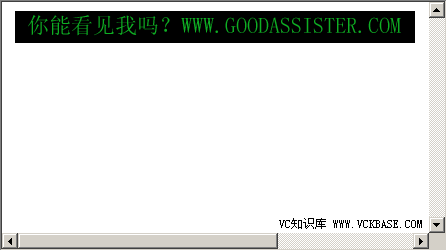
執行結果:
本文完整記錄了從 ATL 專案建立、介面設計、GDI+ 整合、核心繪圖邏輯到 ASP 測試的全過程。核心難點在於 GDI+ 繪圖流程與 ASP Response.BinaryWrite 的串流處理。掌握此架構,可擴展實現各類動態圖片生成需求。