單元測試是確保程式碼品質的關鍵環節。JBuilder 2005 內建強大的測試支援,整合 JUnit 框架並提供視覺化精靈,讓開發者能快速建立測試用例。本文將以 Subsection 類為例,詳細示範如何使用 JBuilder 2005 建立測試用例、編寫測試規則、執行測試並分析結果。
在編輯器中開啟 Subsection.java,確保它處於啟動狀態。依序選擇 File → New... → Test,在 Test 頁面的物件庫中雙擊 Test Case 圖示,即可啟動建立測試用例的精靈。
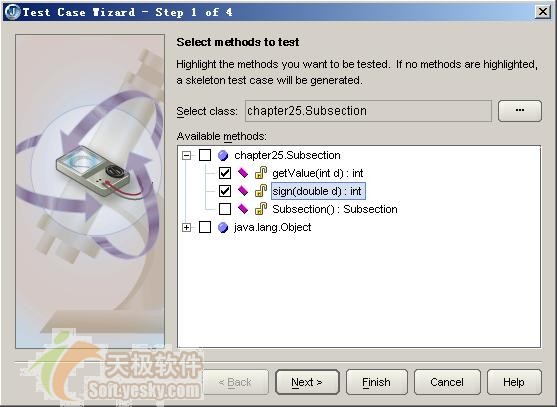
精靈第一步會顯示以下選項:
public、protected 及預設可視域的方法(private 方法不列出,但透過測試公共方法可間接驗證)。本例選擇 getValue() 與 sign() 兩個方法。點擊 Next 進入下一步。
JBuilder 預設以 Test<業務類別名> 命名,套件名與業務類別相同。建議將測試用例放入獨立套件(如 test.super.bdbj),以達成物理與邏輯上的分離,保持專案結構清晰。
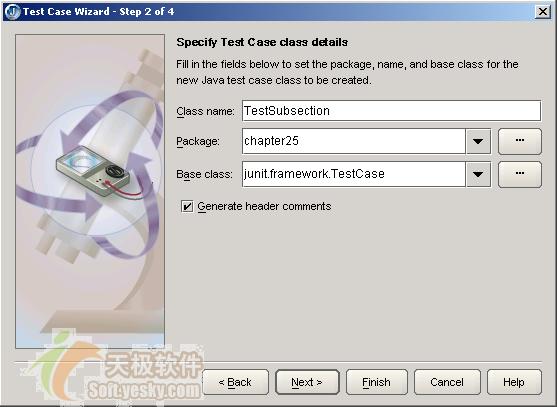
接受預設值,點擊 Finish 即可建立 TestSubsection 測試用例類別。
1. package chapter25;
2.
3. import junit.framework.*;
4. public class TestSubsection extends TestCase {
5. private Subsection subsection = null;
6. protected void setUp() throws Exception {
7. super.setUp();
8. subsection = new Subsection();
9. }
10.
11. protected void tearDown() throws Exception {
12. subsection = null;
13. super.tearDown();
14. }
15.
16. public void testGetValue() {
17. int d = 0;
18. int expectedReturn = 0;
19. int actualReturn = subsection.getValue(d);
20. assertEquals("return value", expectedReturn, actualReturn);
21. /**@todo fill in the test code*/
22. }
23.
24. public void testSign() {
25. double d = 0.0;
26. int expectedReturn = 0;
27. int actualReturn = subsection.sign(d);
28. assertEquals("return value", expectedReturn, actualReturn);
29. /**@todo fill in the test code*/
30. }
31. }
關鍵點解析:
Subsection 成員變數,第 7 行在 setUp() 中實例化,第 12 行在 tearDown() 中釋放,三者構成「測試固件」。雖然本例方法為靜態,不需固件,但保留有助於概念理解。assertXxx() 實作。public void testXxx() 命名規範,輔助方法切勿以 test 開頭。針對關鍵邊界值設計測試點,可大幅提升測試覆蓋率。以下為修改後的測試程式碼:
public void testGetValue() {
    int d1 = -3, y1 = 3;
    int d2 = -2, y2 = 4;
    int d3 = 0,  y3 = 100;
    int d4 = 2,  y4 = 8;
    int d5 = 33, y5 = 32768;
    int d6 = 33, y6 = Integer.MAX_VALUE;
    assertEquals(y1, subsection.getValue(d1));
    assertEquals(y2, subsection.getValue(d2));
    assertEquals(y3, subsection.getValue(d3));
    assertEquals(y4, subsection.getValue(d4));
    assertEquals(y5, subsection.getValue(d5));
    assertEquals(y6, subsection.getValue(d6));
}

public void testSign() {
    double d1 = -1.0, d2 = 0.0, d3 = 1.0;
    int y1 = 1, y2 = 0, y3 = 1;
    assertEquals(y1, subsection.sign(d1));
    assertEquals(y2, subsection.sign(d2));
    assertEquals(y3, subsection.sign(d3));
}
getValue() 設定 6 個測試點(含邊界與溢位),sign() 設定 3 個測試點(負數、零、正數),著重於特殊轉換點。
在專案窗格資源樹中右鍵點擊 TestSubsection.java,選擇 Run Test using "TestSubsection1",JBuilder 將啟動 JBTestRunner 執行測試。
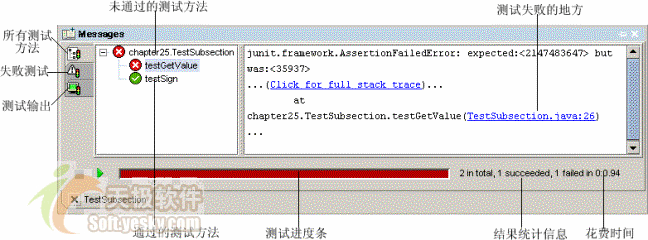
| 標籤頁 | 功能 |
|---|---|
 測試階層 | 預設顯示,呈現「測試套件→測試用例→測試方法」三層樹狀結構。綠色圖示  表示通過,紅色  表示失敗。點擊失敗節點,右側顯示錯誤堆疊追蹤。 |
| 測試錯誤 | 僅列出發生錯誤的測試,為階層頁的子集。 |
 輸出主控台 | 顯示 System.out.println() 等輸出訊息。 |
進度條顯示執行進度(綠色=全通過,紅色=有失敗),右側統計總測試數、成功數、耗時。右側框架顯示失敗斷言位置,點擊連結可自動定位到原始碼行(如 assertEquals(y5, subsection.getValue(d5))),快速找出問題根因——本例中揭露 getValue() 未處理 int 溢位情況。