身為 Web 開發人員,現在是最好的時代。從未有過如此豐富的技術選擇:優秀的開源 Web 伺服器、資料庫、程式語言與開發框架任君挑選。無論您採用何種技術組合,都有一個單一的整合開發環境 (IDE) 能提升生產力——Eclipse。
在「使用 Eclipse Europa 進行 Web 開發」系列中,您將看到 Eclipse 如何成為適用於各種語言的 Web 開發平台。靈活的外掛系統讓我們能輕鬆打造針對 Java、PHP、Ruby 等語言客製化的 Eclipse 版本。本系列將建立一個範例 Web 應用程式,允許輸入棒球選手的比賽資料並計算其統計數據。
Ruby on Rails 的聲勢日漸壯大。TIOBE 軟體品質追蹤數據顯示,Ruby 是成長最快的語言,主要歸功於 Rails。Rails 之所以受歡迎,在於它能讓開發更輕鬆。想進一步簡化工作嗎?試試 Eclipse。這不代表要您轉用 Java 技術。透過 Eclipse 進行 Ruby Web 開發,與使用 Java 技術一樣容易。Eclipse Ruby Development Toolkit (RDT) 與 RadRails 使這一切成為可能。
在第 2 部分中,我們探討了搭配 IDE 使用 PHP 的優點,那些優點同樣適用於 Ruby,也是 RDT 的設計靈感來源。RDT 提供所有 IDE 基礎功能:語法醒目標示、著色與驗證、程式碼完成與格式化、專案組織;內建 Ruby 偵錯器,對大型專案至關重要;還有 Ruby 專屬功能,如整合 Test::Unit 的正規表示式 (regex) 編輯器/測試器與單元測試支援。
本教學為三部曲的第 3 部分,將介紹 RDT 與 RadRails 外掛,說明如何取得並開始使用。您將學會如何用 RadRails 完成常見的 Ruby on Rails 開發任務,並見證它如何讓測試與偵錯 Rails 應用程式更輕鬆。
本教學涉及 Ruby Web 開發,與 Ruby on Rails 開發高度相關,因此需要具備一些 Rails 開發經驗。熟悉 Eclipse 有幫助但非必須。教學將建立在第 1 部分與第 2 部分用 Java 和 PHP 建立的應用程式基礎上。具備 Java 與 Ruby 程式背景對發揮教學效果至關重要。
如前所述,RDT 提供 IDE 核心功能:語法醒目標示、著色驗證、程式碼完成格式化、專案組織、Ruby 偵錯器、regex 編輯器/測試器與單元測試支援。讓我們看看如何安裝 RDT。
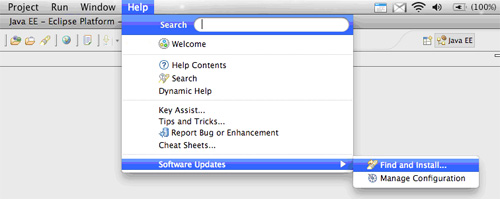
Eclipse 更新系統讓安裝 RDT 相當簡單。首先選擇 Help > Software Updates > Find and Install。
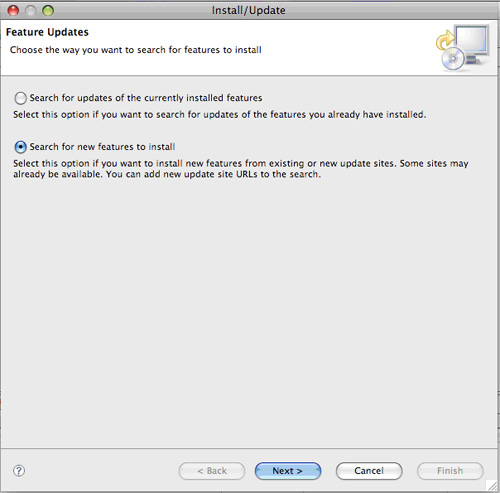
RDT 是新增功能,選擇 Search for new features to install。
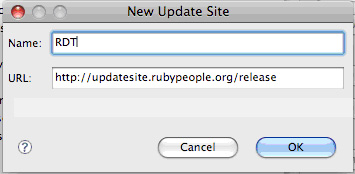
點選 New Remote Site,輸入 RDT 更新站點 URL:https://updatesite.rubypeople.org/release,名稱自訂。
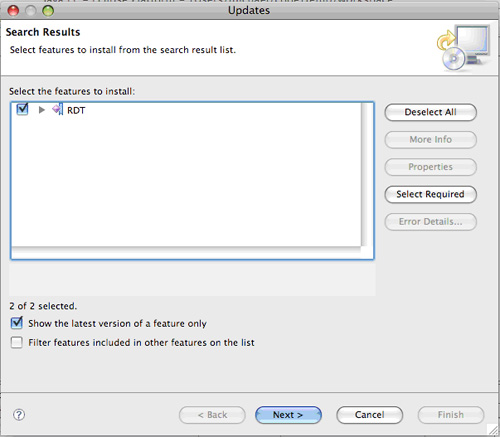
完成後,勾選新站點並點選 Finish,即會列出可用外掛。勾選 RDT 繼續。
接受授權協議,點選 Next > Finish,Eclipse 將下載安裝 RDT。安裝完成後,透過 Window > Open Perspective > Other 切換至 Ruby Perspective 驗證安裝。
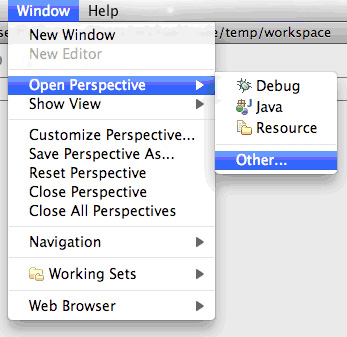
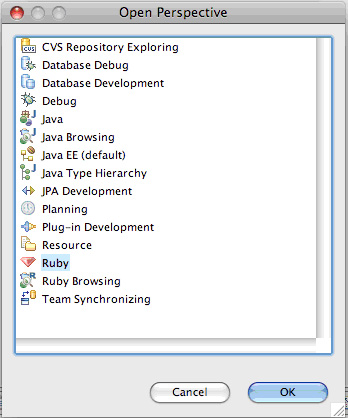
現在可以建立 Ruby 專案、類別、單元測試與 regex,但我們的目標是 Web 開發,需要更多功能——RadRails。
Ruby 功能強大,幾乎能實現任何功能,當然包含 Web 開發。若用 Ruby 進行 Web 開發,幾乎一定會用到 Ruby on Rails。RDT 雖不瞭解 Rails 特殊資訊,但能提供開發 Ruby 程式碼的基礎功能。RDT 開發者為 Rails 開發者另創建了一組工具:RadRails。RadRails 建構於 RDT 之上,為 Eclipse 增加專用 Rails 功能。讓我們在 RDT 基礎上安裝 RadRails。
安裝 RadRails 需先安裝 Aptana 外掛。Aptana 提供優秀的 JavaScript 與 CSS 工具。最新版 RadRails 重構於 Aptana 之上,同樣是 Eclipse 外掛。步驟與安裝 RDT 類似,但需不同更新站點:https://update.aptana.com/install/3.2/。
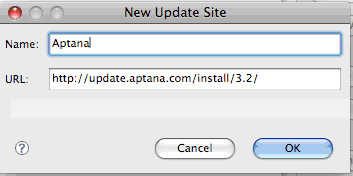
安裝所有 Aptana 功能後,Eclipse 需重新啟動。重啟後選擇 Help > Aptana Start Page 開啟啟動頁面。
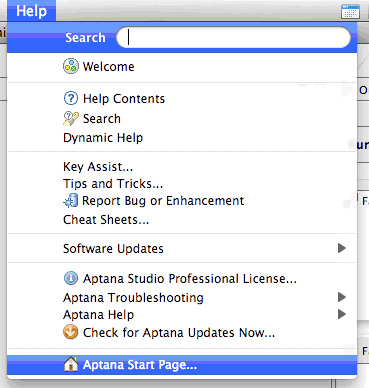
在啟動頁面找到 Ruby on Rails,點選 Install,Aptana 將啟動 Eclipse 更新系統安裝 RadRails。
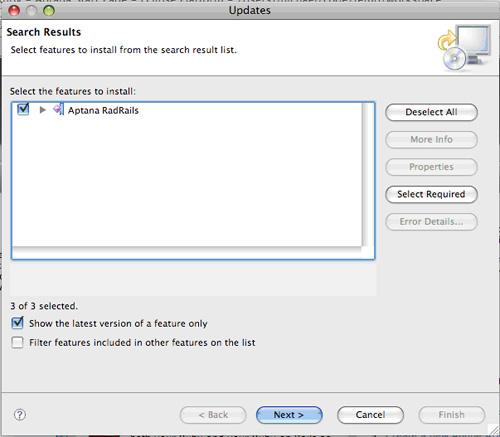
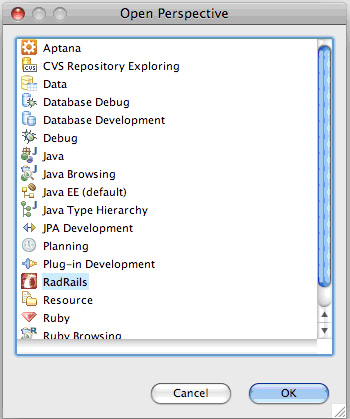
安裝完成後 Eclipse 再次重啟。透過 Window > Open Perspective > Other 選擇 RadRails Perspective。
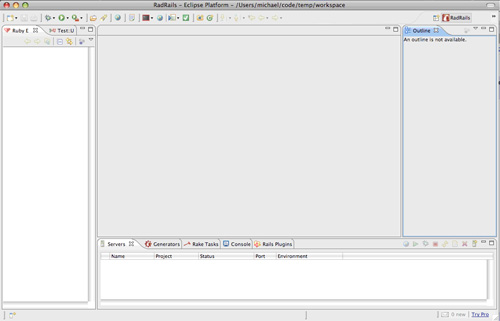
RadRails 已就緒!接著將使用它建立新的 Rails Web 應用程式,並在開發過程中探索各項功能。
專案是 Eclipse 核心概念與工作單元,RadRails 充分利用此機制。選擇 File > New > Rails Project。
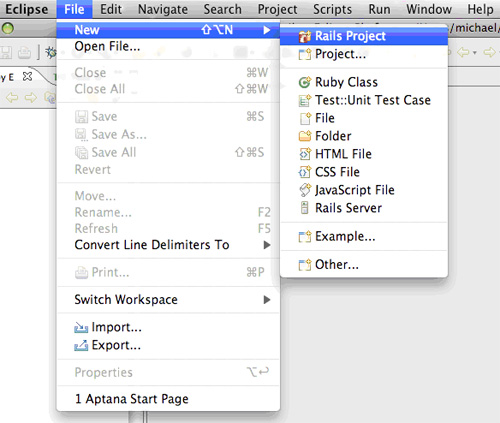
注意幾個選項:預設勾選 Generate Rails application skeleton;Create a WEBrick server 與 Create a Mongrel server 選項可讓您直接從 Eclipse 啟動應用程式(Mongrel 需預先安裝,可用 gem install mongrel 取得)。點選 Finish,Console 將顯示 Rails 專案骨架產生輸出:
exists
 create app/controllers
 create app/helpers
 create app/models
 create app/views/layouts
 create config/environments
 create components
 create db
 create doc
 create lib
 create lib/tasks
 create log
 create public/images
 create public/javascripts
 create public/stylesheets
 create script/performance
 create script/process
 create test/fixtures
 create test/functional
 create test/integration
 create test/mocks/development
 create test/mocks/test
 create test/unit
 create vendor
 create vendor/plugins
 create tmp/sessions
 create tmp/sockets
 create tmp/cache
 create tmp/pids
 create Rakefile
 create README
 create app/controllers/application.rb
 create app/helpers/application_helper.rb
 create test/test_helper.rb
 create config/database.yml
 create config/routes.rb
 create public/.htaccess
 create config/boot.rb
 create config/environment.rb
 create config/environments/production.rb
 create config/environments/development.rb
 create config/environments/test.rb
 create script/about
 create script/breakpointer
 create script/console
 create script/destroy
 create script/generate
 create script/performance/benchmarker
 create script/performance/profiler
 create script/process/reaper
 create script/process/spawner
 create script/process/inspector
 create script/runner
 create script/server
 create script/plugin
 create public/dispatch.rb
 create public/dispatch.cgi
 create public/dispatch.fcgi
 create public/404.html
 create public/500.html
 create public/index.html
 create public/favicon.ico
 create public/robots.txt
 create public/images/rails.png
 create public/javascripts/prototype.js
 create public/javascripts/effects.js
 create public/javascripts/dragdrop.js
 create public/javascripts/controls.js
 create public/javascripts/application.js
 create doc/README_FOR_APP
 create log/server.log
 create log/production.log
 create log/development.log
 create log/test.log
這正是執行 rails baseball 的標準輸出。RadRails 的主題在於:它利用 Rails 內建機制,但簡化了操作。在 Ruby Explorer (RDT 組件) 中可看到所有生成的程式碼結構。
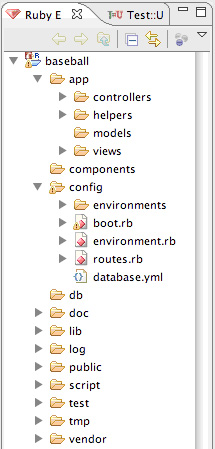
接下來需配置資料庫。
開啟 config/database.yml 並編輯如下:
# MySQL (default setup). Versions 4.1 and 5.0 are recommended.
#
# Install the MySQL driver:
# gem install mysql
# On MacOS X:
# gem install mysql -- --include=/usr/local/lib
# On Windows:
# gem install mysql
# Choose the win32 build.
# Install MySQL and put its /bin directory on your path.
#
# And be sure to use new-style password hashing:
# https://dev.mysql.com/doc/refman/5.0/en/old-client.html
development:
  adapter: mysql
  database: baseball
  username: root
  password: password
  host: localhost

# Warning: The database defined as 'test' will be erased and
# re-generated from your development database when you run 'rake'.
# Do not set this db to the same as development or production.
test:
  adapter: mysql
  database: baseball_test
  username: root
  password:
  host: localhost

production:
  adapter: mysql
  database: baseball_production
  username: root
  password:
  host: localhost
我們已為系列前幾部分建立的每個資料庫編輯該檔案。可使用 RadRails 專屬的 Data Perspective 立即測試設定。
選擇 Window > Open Perspective > Data 開啟。
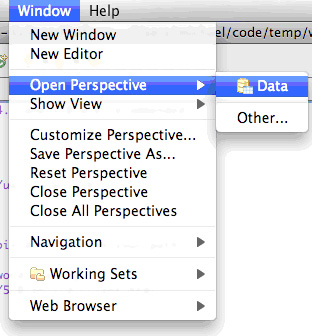

Data Perspective 可檢視資料庫表格並執行查詢,類似先前教學的 Database Development Perspective,但它直接使用 database.yml 設定,與應用程式共用同一配置。
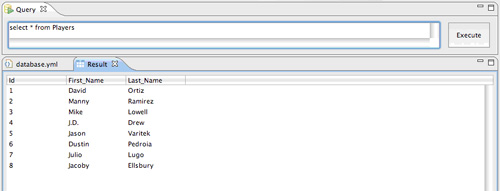
Rails 通常搭配新資料庫使用,但也提供工具處理舊有資料庫,需用 Ruby 建構工具:Rake。
RadRails 不試圖取代 Rails 內建工具,而是提供更簡單的介面存取這些工具。以 Rake 為例,它對複雜 Ruby 應用程式至關重要,Rails 用它執行許多任務,包括對舊有結構反向工程。
回到 RadRails Perspective 開啟 Rake 視窗,在下拉選單選擇 db:schema:dump。
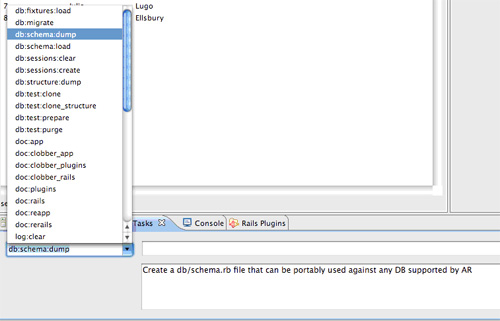
點選 Go,Rails 將建立定義資料庫的 Ruby 腳本,位於 db/schema.rb:
# This file is autogenerated. Instead of editing this file, please use the
# migrations feature of ActiveRecord to incrementally modify your database, and
# then regenerate this schema definition.

ActiveRecord::Schema.define() do

create_table "Games", :id => false, :force => true do |t|
t.column "Id", :integer, :null => false
t.column "Player_Id", :integer, :null => false
t.column "AB", :integer, :default => 0, :null => false
t.column "H", :integer, :default => 0, :null => false
t.column "2B", :integer, :default => 0, :null => false
t.column "3B", :integer, :default => 0, :null => false
t.column "HR", :integer, :default => 0, :null => false
t.column "BB", :integer, :default => 0, :null => false
t.column "R", :integer, :default => 0, :null => false
t.column "RBI", :integer, :default => 0, :null => false
end

add_index "Games", ["Player_Id"], :name => "Player_Id"

create_table "Players", :id => false, :force => true do |t|
t.column "Id", :integer, :null => false
t.column "First_Name", :string, :limit => 50, :default => "",
:null => false
t.column "Last_Name", :string, :limit => 50, :default => "",
:null => false
end

end
RadRails 只是利用 Rails 現有功能,提供更簡單的方式執行特定 Rake 任務,無需記住所有指令細節。Rake 任務在 Rails 中很常見,但更常見(尤其啟動新應用時)的是 Rails 產生器,RadRails 也提供了協助。
存取產生器的方式類似 Rake 任務,使用 Generator View。

下拉選單列出常見 Rails 產生器類型。
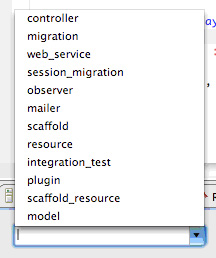
大多數指令至少有一個參數,可在文字方塊輸入;也有幾個常見選項可直接勾選。通常首先生成的是 ActiveRecord 模型。
先為棒球選手產生模型。在 Generator View 選擇 model,參數輸入 player。

點選 Go,Console 顯示輸出:
exists app/models/
 exists test/unit/
 exists test/fixtures/
 create app/models/player.rb
 create test/unit/player_test.rb
 create test/fixtures/players.yml
 create db/migrate
 create db/migrate/001_create_players.rb
這與執行 ruby script/generate model player 結果相同。Ruby Explorer 會自動重新整理顯示生成的類別與檔案。
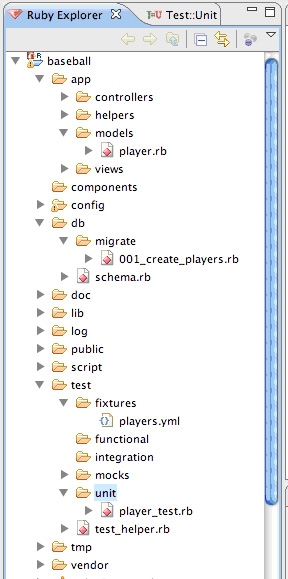
對 game 模型執行相同步驟,再編輯模型建立選手與比賽的一對多關聯:
class Player < ActiveRecord::Base
  has_many :games
end

class Game < ActiveRecord::Base
  belongs_to :player
end
Rails 產生的另一實用工具是 Scaffolding。
產生 Rails scaffolding 方式類似模型產生。選擇 scaffold,參數輸入 player gm。

輸出如下:
exists app/controllers/
 exists app/helpers/
 exists app/views/gm
 create app/views/layouts/
 create test/functional/
 dependency model
 exists app/models/
 exists test/unit/
 exists test/fixtures/
 create app/models/player.rb
 create test/unit/player_test.rb
 create test/fixtures/players.yml
 create app/views/gm/_form.rhtml
 create app/views/gm/list.rhtml
 create app/views/gm/show.rhtml
 create app/views/gm/new.rhtml
 create app/views/gm/edit.rhtml
 create app/controllers/gm_controller.rb
 create test/functional/gm_controller_test.rb
 create app/helpers/gm_helper.rb
 create app/views/layouts/gm.rhtml
 create public/stylesheets/scaffold.css
這是 ruby script/generate scaffold player gm 的標準輸出。繼續產生比賽的 scaffolding。

透過 Ruby Explorer 檢視所有生成的程式碼。
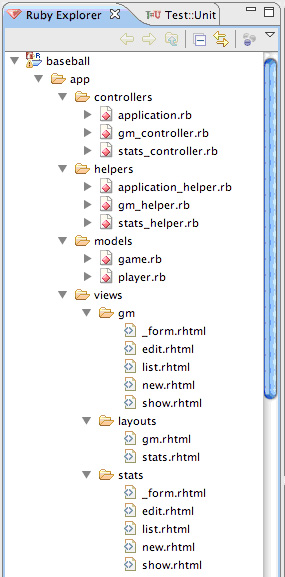
現在測試應用程式確保運作正常。
切換到 Servers View 啟動應用程式。

選中 baseballServer 點選 Start,RadRails 啟動伺服器,Console 顯示:
=> Booting Mongrel (use 'script/server webrick' to force WEBrick)
=> Rails application starting on https://0.0.0.0:3000
=> Call with -d to detach
=> Ctrl-C to shutdown server
** Starting Mongrel listening at 0.0.0.0:3000
** Starting Rails with development environment...
** Rails loaded.
** Loading any Rails specific GemPlugins
** Signals ready. TERM => stop. USR2 => restart. INT => stop (no restart).
** Rails signals registered. HUP => reload (without restart). It might not work well.
** Mongrel available at 0.0.0.0:3000
** Use Ctrl-C to stop.
在瀏覽器訪問 https://localhost:3000/gm 即可看到應用程式。
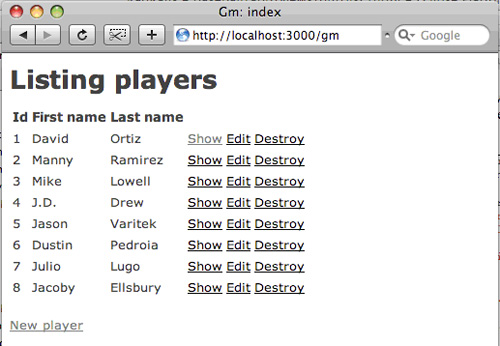
點選 Show 會出現錯誤。
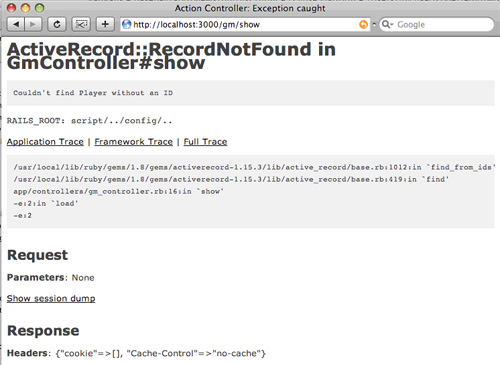
錯誤訊息顯示嘗試載入帶有 ID 的選手,但不清楚具體問題。若能獲得更多錯誤資訊豈不更好?我們可加入日誌陳述,但 RadRails 提供更強大工具:偵錯。
在 gm_controller 的 show 動作加入中斷點,以偵錯模式啟動伺服器。
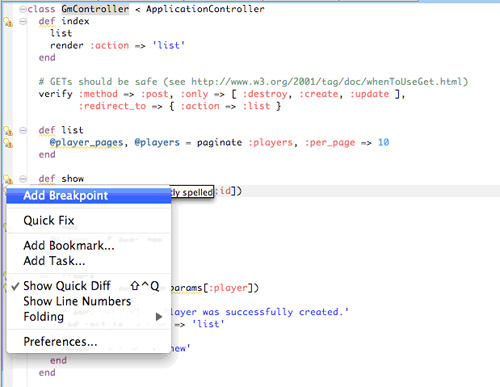

瀏覽器點選 Show 連結時,將啟動 Debug Perspective。
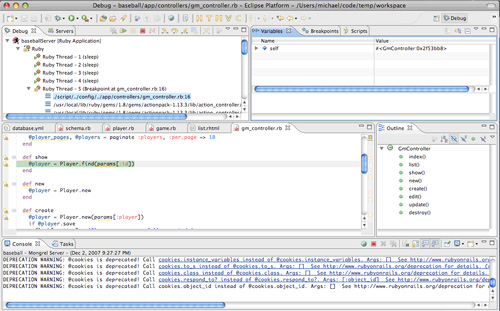
展開 Variables 視窗中的 self 物件。
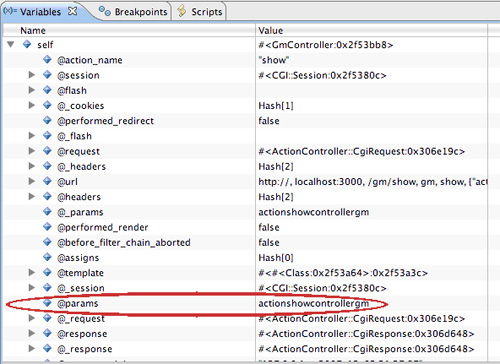
發現 params 變數為空雜湊,正常應包含要顯示選手的 ID。檢視 views/gm/list.rhtml 中 Show 連結的建立方式:
<tr>
 <% for column in Player.content_columns %>
 <td><%=h player.send(column.name) %></td>
 <% end %>
 <td><%= link_to 'Show', :action => 'show',
 :id => player %></td>
 <td><%= link_to 'Edit', :action => 'edit',
 :id => player %></td>
 <td><%= link_to 'Destroy', { :action => 'destroy',
 :id => player }, :confirm => 'Are you sure?',
 :method => :post %></td>
</tr>
問題在於 :id => player。Rails 預設計算為 player.id,但資料表主鍵欄位名為 Id (大寫),需顯式使用 player.Id。
<tr>
 <% for column in Player.content_columns %>
 <td><%=h player.send(column.name) %></td>
 <% end %>
 <td><%= link_to 'Show', :action => 'show',
 :id => player.Id %></td>
 <td><%= link_to 'Edit', :action => 'edit',
 :id => player.Id %></td>
 <td><%= link_to 'Destroy', { :action => 'destroy',
 :id => player.Id }, :confirm => 'Are you sure?',
 :method => :post %></td>
</tr>
同樣修正 Show 頁面與 Edit 頁面。重新載入 https://localhost:3000/gm,點選 Show、Edit、Destroy 連結將不再出錯。
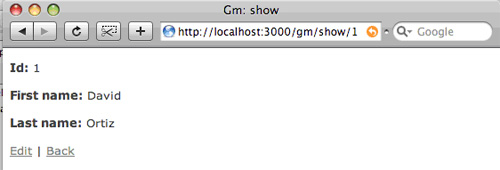
本教學原始碼包含上述修正。
本教學探討 RadRails 為 Ruby on Rails 開發者帶來的優勢。它只是安裝在 Eclipse 上的另一組外掛,提供優秀的 Ruby 編輯器與一組專用 Rails 工具。我們見證了如何用 RadRails 輕鬆執行 Rake 任務、產生程式碼、啟動與偵錯應用程式。現在您可以繼續使用 RadRails 更快速地開發 Ruby on Rails 應用程式。
當然,若覺得特定應用程式更適合用 Java 或 PHP 開發,Eclipse 依然支援。許多 Web 開發內容與程式語言無關(如資料庫操作、部署與偵錯),加上「使用 Eclipse」這一項,無論採用何種語言,Eclipse 平台都能提升 Web 開發人員生產力。