本文手把手教你在 Eclipse 中搭建 SWT/JFace 開發環境,並跑通第一個 HelloWorld 程式,包含常見坑點排查。
File → New → Java Project,任意專案名稱。
從 Eclipse 安裝目錄 plugins/ 找到並加入 Build Path:
org.eclipse.swt_3.x.x.jarorg.eclipse.jface_3.x.x.jarorg.eclipse.core.runtime_3.x.x.jarorg.eclipse.ui.workbench_3.x.x.jar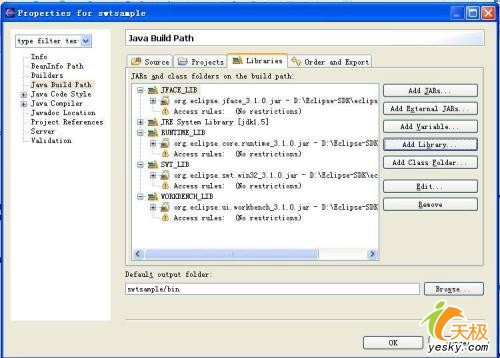
SWT 透過 JNI 呼叫 OS 原生 API,需載入 swt-win32-*.dll。三種方式任選一:
plugins/org.eclipse.swt.win32_3.x.x.jar 解壓,把 os/win32/x86/ 下所有 .dll 複製到 JRE/bin/ 目錄。PATH。-Djava.library.path=你的DLL目錄。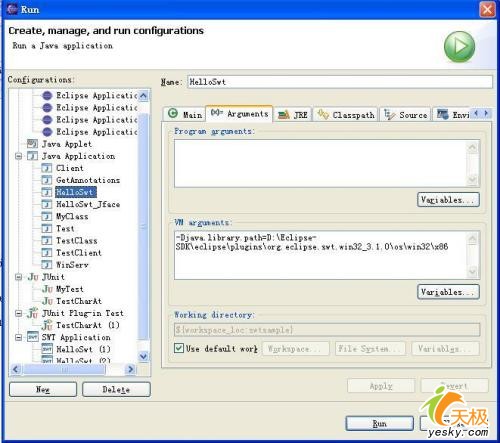
package swtjfacesample;

import org.eclipse.swt.SWT;
import org.eclipse.swt.widgets.Display;
import org.eclipse.swt.widgets.Shell;
import org.eclipse.swt.widgets.Text;

public class HelloSwt {
    public static void main(String[] args) {
        Display display = new Display();
        Shell shell = new Shell(display);

        Text helloText = new Text(shell, SWT.CENTER);
        helloText.setText("Hello, World!");
        helloText.pack();

        shell.pack();
        shell.open();

        while (!shell.isDisposed()) {
            if (!display.readAndDispatch()) display.sleep();
        }
        display.dispose();
    }
}
右鍵類 → Run As → Java Application。正常彈出視窗顯示「Hello, World!」即成功。

| 現象 | 原因與對策 |
|---|---|
| 編譯錯誤:找不到 Display、Text 等類 | 核心 JAR 未正確加入 Build Path,檢查第 2 步 |
運行拋出 UnsatisfiedLinkError: no swt-win32-xxxx in java.library.path | DLL 未正確載入,按第 3 步重新配置 |
環境就緒,後續課程將直接聚焦 API 實戰,不再重複配置步驟。