SWT 採用布局管理器機制實現跨平台 GUI 的自適應定位,避免絕對座標在不同解析度、字型、DPI 下的失效。本文系統介紹四大核心布局管理器的特性、參數配置與實戰代碼,並示範如何繼承 Layout 抽象類開發自定義布局。
LayoutManager 計算子組件位置、大小,父組件大小變化時自動重排。GridData),控制對齊、跨格、邊距等細節。parent.setLayout(layout) → 為子組件設定 LayoutData(可選) → 父組件調整大小時自動觸發佈局。最簡單佈局,子組件等寬/等高單行或單列排列。適用於工具列、狀態列或單一組件填滿父容器。
| 常數 | 說明 |
|---|---|
SWT.HORIZONTAL | 水平排列(預設) |
SWT.VERTICAL | 垂直排列 |
marginWidth、marginHeight:左右/上下邊距(像素)spacing:組件間距FillLayout fillLayout = new FillLayout(SWT.HORIZONTAL);
fillLayout.marginHeight = 25;
fillLayout.marginWidth = 25;
fillLayout.spacing = 10;
shell.setLayout(fillLayout);
new Button(shell, SWT.PUSH).setText("button1");
new Button(shell, SWT.PUSH).setText("button number 2");
new Button(shell, SWT.PUSH).setText("3");
shell.pack(); shell.open();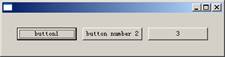
圖 1 FillLayout 布局實例
類似 HTML 流式佈局,支援換行、組件保持原尺寸、邊距與間距獨立設定。
| 屬性 | 說明 |
|---|---|
wrap | 是否自動換行(true/false) |
pack | 組件是否保持原有大小(true/false) |
justify | 是否根據父組件寬度調整組件寬度 |
marginLeft/Top/Right/Bottom | 四邊邊距 |
spacing | 組件間距 |
button.setLayoutData(new RowData(60, 60)); // 固定 60x60 像素RowLayout rowLayout = new RowLayout();
rowLayout.pack = true;
rowLayout.wrap = true;
rowLayout.justify = true;
rowLayout.marginLeft = 30;
rowLayout.marginTop = 30;
shell.setLayout(rowLayout);
Text t = new Text(shell, SWT.SINGLE | SWT.BORDER);
Button b = new Button(shell, SWT.BORDER); b.setText("OK");
Button b1 = new Button(shell, SWT.BORDER); b1.setText("Cancel");
b1.setLayoutData(new RowData(60, 60));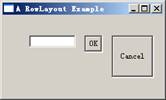
圖 2 RowLayout 布局實例
將父組件劃分為行列網格,子組件按加入順序依序佔據單元格,支援跨行跨列、多種對齊、邊距、間距與動態搶佔空間。
| 屬性 | 說明 |
|---|---|
numColumns | 列數(必設) |
makeColumnsEqualWidth | 所有列等寬(true/false) |
marginLeft/Top/Right/Bottom | 四邊邊距 |
horizontalSpacing | 水平間距 |
verticalSpacing | 垂直間距 |
每個子組件需獨立 GridData 實例(不可共用)。關鍵屬性:
| 屬性 | 說明 | |
|---|---|---|
horizontalAlignment | 水平對齊:BEGINNING, CENTER, END, FILL | |
verticalAlignment | 垂直對齊:同上 | |
horizontalIndent | 水平縮進(需配合 BEGINNING) | |
horizontalSpan | 跨列數 | |
| verticalSpan | 跨行數 | |
grabExcessHorizontalSpace | 父寬度變化時是否水平搶佔空間 | |
grabExcessVerticalSpace | 父高度變化時是否垂直搶佔空間 | |
widthHint, heightHint | 建議寬/高(像素) |
GridLayout gridLayout = new GridLayout();
gridLayout.numColumns = 3;
shell.setLayout(gridLayout);

// Dog Name: 標籤 + 輸入框跨兩列
new Label(shell, SWT.NONE).setText("Dog's Name:");
dogName = new Text(shell, SWT.SINGLE | SWT.BORDER);
GridData gd = new GridData(GridData.HORIZONTAL_ALIGN_FILL);
gd.horizontalSpan = 2;
dogName.setLayoutData(gd);

// Breed: 下拉框填滿
new Label(shell, SWT.NONE).setText("Breed:");
dogBreed = new Combo(shell, SWT.NONE);
dogBreed.setItems(new String[]{"Collie","Pitbull","Poodle","Scottie"});
dogBreed.setLayoutData(new GridData(GridData.HORIZONTAL_ALIGN_FILL));

// Photo: Canvas 佔 3 行、雙向填滿
new Label(shell, SWT.NONE).setText("Photo:");
dogPhoto = new Canvas(shell, SWT.BORDER);
gd = new GridData(GridData.FILL_BOTH);
gd.widthHint = 80; gd.heightHint = 80;
gd.verticalSpan = 3;
dogPhoto.setLayoutData(gd);

// Categories: List 佔 4 行、雙向填滿
categories = new List(shell, SWT.MULTI | SWT.BORDER | SWT.V_SCROLL);
categories.setItems(new String[]{"Best of Breed", ...});
gd = new GridData(GridData.HORIZONTAL_ALIGN_FILL | GridData.VERTICAL_ALIGN_FILL);
gd.verticalSpan = 4;
gd.heightHint = categories.getItemHeight() * 12;
categories.setLayoutData(gd);

// Buttons with indent
Button browse = new Button(shell, SWT.PUSH); browse.setText("Browse...");
gd = new GridData(GridData.HORIZONTAL_ALIGN_FILL); gd.horizontalIndent = 5;
browse.setLayoutData(gd);

// Owner Info Group (巢狀 GridLayout)
Group ownerInfo = new Group(shell, SWT.NONE);
ownerInfo.setText("Owner Info");
GridLayout gl = new GridLayout(); gl.numColumns = 2;
ownerInfo.setLayout(gl);
gd = new GridData(GridData.HORIZONTAL_ALIGN_FILL); gd.horizontalSpan = 2;
ownerInfo.setLayoutData(gd);
// ... 群組內部元件略 ...

// Enter 按鈕靠右、跨 3 列
Button enter = new Button(shell, SWT.PUSH); enter.setText("Enter");
gd = new GridData(GridData.HORIZONTAL_ALIGN_END); gd.horizontalSpan = 3;
enter.setLayoutData(gd);
圖 5 GridLayout 布局實例
鐵律:每個子組件必須擁有獨立 GridData 實例,即使屬性相同也需 new 多個。
當內建布局無法滿足特殊需求(如固定列寬、特殊對齊邏輯),可自行實作 Layout 子類。
computeSize(Composite, wHint, hHint, flushCache):計算所有子組件所需總寬高,回傳 Point。layout(Composite, flushCache):計算並設定每個子組件的具體位置與大小(setBounds)。public class ColumnLayout extends Layout {
public static final int MARGIN = 4;
public static final int SPACING = 2;
Point[] sizes;
int maxWidth, totalHeight;
protected Point computeSize(Composite c, int wHint, int hHint, boolean flushCache) {
Control[] children = c.getChildren();
if (flushCache || sizes == null || sizes.length != children.length) initialize(children);
int w = (wHint == SWT.DEFAULT) ? maxWidth : wHint;
int h = (hHint == SWT.DEFAULT) ? totalHeight : hHint;
return new Point(w + 2*MARGIN, h + 2*MARGIN);
}
protected void layout(Composite c, boolean flushCache) {
Control[] children = c.getChildren();
if (flushCache || sizes == null || sizes.length != children.length) initialize(children);
Rectangle area = c.getClientArea();
int x = MARGIN, y = MARGIN;
int width = Math.max(area.width - 2*MARGIN, maxWidth);
for (int i=0; ishell.setLayout(new ColumnLayout());
new Button(shell, SWT.PUSH).setText("B1");
new Button(shell, SWT.PUSH).setText("Very Wide Button 2");
Button b3 = new Button(shell, SWT.PUSH); b3.setText("Button 3");
new Text(shell, SWT.NONE).setText("text");
// 動態改變按鈕文字寬度並觸發重排
Button grow = new Button(shell, SWT.PUSH); grow.setText("Grow Button 3");
grow.addSelectionListener(new SelectionAdapter() {
public void widgetSelected(SelectionEvent e) {
b3.setText("Extreemely Wide Button 3");
shell.layout(); shell.pack();
}
});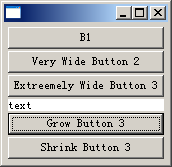
圖 6 自己定義布局(原始大小 / 寬度改變後)
GridData 細節可應對 90%+ 佈局需求。computeSize 與 layout。熟練運用這幾種佈局方式,並理解 LayoutData 的角色,是開發健壯、跨平台 SWT 介面的關鍵基礎。