本文源自 MSDN Magazine 經典專欄,深入解析 WCF 佇列調用 (NetMsmqBinding) 架構、單向調用限制、回應服務模式設計、訊息標頭傳遞上下文、ResponseContext/ResponseClientBase/ResponseScope 三大輔助類實作。適合架構師與資深工程師掌握離線佇列雙向通訊模式。
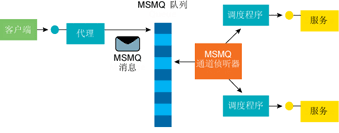
[ServiceContract]
interface IMyContract {
    [OperationContract(IsOneWay = true)]
    void MyMethod();
}

[ServiceBehavior(InstanceContextMode = InstanceContextMode.PerCall)]
class MyService : IMyContract {
    [OperationBehavior(TransactionScopeRequired = true)]
    public void MyMethod() { ... }
}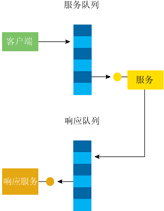
核心思想:服務處理完成後,將結果發送到客戶端提供的回應佇列 (另一個排隊服務)。
[ServiceContract]
interface ICalculatorResponse {
    [OperationContract(IsOneWay = true)]
    void OnAddCompleted(int result, ExceptionDetail error);
}

[ServiceBehavior(InstanceContextMode = InstanceContextMode.PerCall)]
class MyCalculatorResponse : ICalculatorResponse {
    [OperationBehavior(TransactionScopeRequired = true)]
    public void OnAddCompleted(int result, ExceptionDetail error) {
        MessageBox.Show($"結果 = {result}");
        if (error != null) { /* 處理錯誤 */ }
    }
}| 挑戰 | 描述 | 解決方案 |
|---|---|---|
| 多重調用區分 | 同一回應服務處理多個調用,需識別屬於哪個請求 | 客戶端生成唯一 Method ID,經服務透傳至回應 |
| 回應位址發現 | 服務不知客戶端回應佇列位址,配置檔寫死不靈活 | 客戶端將位址放入輸出訊息標頭,服務讀取標頭 |
避免汙染業務合約參數,使用 SOAP Header 傳遞管道層資訊。
// OperationContext 提供標頭集合
OperationContext.Current.IncomingMessageHeaders  // 讀取
OperationContext.Current.OutgoingMessageHeaders  // 寫入

// MessageHeaders 操作
headers.Add(MessageHeader header);
T header = headers.GetHeader<T>(string name, string ns);

// MessageHeader<T> 型別安全包裝
var typedHeader = new MessageHeader<ResponseContext>(context);
var untypedHeader = typedHeader.GetUntypedHeader("ResponseContext", "ns");
headers.Add(untypedHeader);
[DataContract]
public class ResponseContext {
    [DataMember] public string ResponseAddress { get; set; }
    [DataMember] public string MethodId { get; set; }
    [DataMember] public string FaultAddress { get; set; } // 可選:獨立錯誤佇列

    // 靜態屬性:封裝 Current 訊息標頭存取
    public static ResponseContext Current {
        get {
            var headers = OperationContext.Current.IncomingMessageHeaders;
            return headers.GetHeader<ResponseContext>("ResponseContext", "ns");
        }
        set {
            var headers = OperationContext.Current.OutgoingMessageHeaders;
            var typed = new MessageHeader<ResponseContext>(value);
            headers.Add(typed.GetUntypedHeader("ResponseContext", "ns"));
        }
    }

    // 建構函數:自動生成 GUID MethodId
    public ResponseContext(string responseAddress) : this(responseAddress, Guid.NewGuid().ToString()) {}
    public ResponseContext(string responseAddress, string methodId) { ... }
}string methodId = Guid.NewGuid().ToString();
string responseQueue = "net.msmq://localhost/private/MyCalculatorResponseQueue";
var proxy = new CalculatorClient();
using (var scope = new OperationContextScope(proxy.InnerChannel)) {
// 建立新操作上下文,寫入標頭
ResponseContext.Current = new ResponseContext(responseQueue, methodId);
proxy.Add(2, 3); // 實際入隊
}
// 此時 methodId 可用於追蹤
proxy.Close();
public class ResponseClientBase<T> : ClientBase<T> where T : class {
    public readonly string ResponseAddress;

    public ResponseClientBase(string responseAddress) { ResponseAddress = responseAddress; }
    public ResponseClientBase(string responseAddress, string endpointName) : base(endpointName) { ResponseAddress = responseAddress; }
    public ResponseClientBase(string responseAddress, NetMsmqBinding binding, EndpointAddress remoteAddress) : base(binding, remoteAddress) { ResponseAddress = responseAddress; }

    protected string Enqueue(string operation, params object[] args) {
        using (var scope = new OperationContextScope(InnerChannel)) {
            string methodId = GenerateMethodId(); // 可覆寫
            ResponseContext.Current = new ResponseContext(ResponseAddress, methodId);
            var method = typeof(T).GetMethod(operation);
            method.Invoke(Channel, args); // 反射調用
            return methodId;
        }
    }

    protected virtual string GenerateMethodId() => Guid.NewGuid().ToString();
}
public class CalculatorClient : ResponseClientBase<ICalculator> {
    public CalculatorClient(string responseAddress) : base(responseAddress) {}
    public CalculatorClient(string responseAddress, string endpointName) : base(responseAddress, endpointName) {}
    public CalculatorClient(string responseAddress, NetMsmqBinding binding, EndpointAddress remoteAddress) : base(responseAddress, binding, remoteAddress) {}

    public string Add(int n1, int n2) => Enqueue("Add", n1, n2);
    // 其他操作...
}var proxy = new CalculatorClient("net.msmq://localhost/private/MyCalculatorResponseQueue");
string methodId = proxy.Add(2, 3); // 返回 MethodId 供追蹤
proxy.Close();public void Add(int n1, int n2) {
int result = 0; ExceptionDetail error = null;
try { result = n1 + n2; }
catch (Exception ex) { error = new ExceptionDetail(ex); }
finally {
var ctx = ResponseContext.Current;
var address = new EndpointAddress(ctx.ResponseAddress);
var binding = new NetMsmqBinding();
var proxy = new CalculatorResponseClient(binding, address);
using (var scope = new OperationContextScope(proxy.InnerChannel)) {
ResponseContext.Current = ctx; // 透傳 MethodId
proxy.OnAddCompleted(result, error);
}
proxy.Close();
}
}
public class ResponseScope<T> : IDisposable where T : class {
    private OperationContextScope _scope;
    public readonly T Response; // 回應服務 Proxy

    public ResponseScope() : this(new NetMsmqBinding()) {}
    public ResponseScope(string bindingConfig) : this(new NetMsmqBinding(bindingConfig)) {}
    public ResponseScope(NetMsmqBinding binding) {
        var ctx = ResponseContext.Current;
        var address = new EndpointAddress(ctx.ResponseAddress);
        var factory = new ChannelFactory<T>(binding, address);
        Response = factory.CreateChannel();

        // 關鍵:建構子中立即切換上下文,寫入標頭
        _scope = new OperationContextScope(Response as IContextChannel);
        ResponseContext.Current = ctx;
    }

    public void Dispose() {
        (Response as IDisposable)?.Dispose();
        _scope?.Dispose(); // 恢復原上下文
    }
}
finally {
    using (var scope = new ResponseScope<ICalculatorResponse>()) {
        scope.Response.OnAddCompleted(result, error);
    }
}[ServiceBehavior(InstanceContextMode = InstanceContextMode.PerCall)]
class MyCalculatorResponse : ICalculatorResponse {
[OperationBehavior(TransactionScopeRequired = true)]
public void OnAddCompleted(int result, ExceptionDetail error) {
string methodId = ResponseContext.Current.MethodId;
if (error == null) {
// 通知客戶端應用、觸發事件、更新 UI...
} else {
// 記錄錯誤、告警、補償邏輯...
}
}
}
TransactionScopeRequired=true 確保入隊/出隊/回應原子性本文技術模式廣泛適用於:
原文作者:Juval Lowy (IDesign 架構師,《Programming WCF Services》作者)
原文連結:MSDN Magazine