承接上一篇 WCF 基礎架構觀念,本文將帶您完整實作一個自訂宿主托管的 WCF 解決方案。針對初學者最易卡關的「服務配置」與「用戶端加入參考」兩大環節,提供從專案結構規劃、服務契約定義、宿主程式撰寫、組態檔配置,到用戶端 Proxy 產生與呼叫驗證的端到端圖文教學,作為您邁向 WCF 分散式開發的實戰參考指南。
標準 WCF 方案包含三大核心專案:
ServiceHost、配置端點與行為。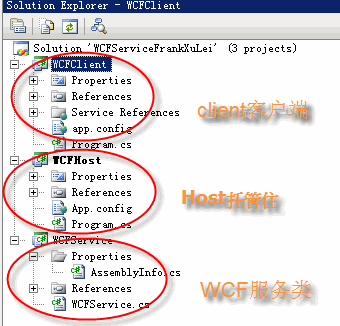
WCF 基於 SOAP/XML 通訊,支援跨進程、跨機器、跨平台(Java/J2EE、Linux、Solaris 等)互通。.NET 平台上可建立 Console、WinForm、Windows Service、ASP.NET 等各類用戶端應用程式存取 WCF 服務。
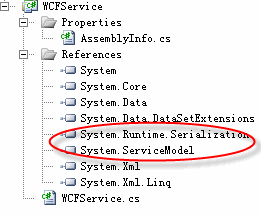
Visual Studio 2008 提供「WCF 服務類別庫」範本,自動引用 System.ServiceModel 與 System.Runtime.Serialization 兩大核心組件,定義契約屬性所在:
using System.ServiceModel;
using System.Runtime.Serialization;
// 服務契約
[ServiceContract(Namespace = "https://www.cnblogs.com/frank_xl/")]
public interface IWCFService
{
    [OperationContract]
    string SayHello(string name);

    [OperationContract]
    string SayHelloToUser(User user);
}

// 服務實作
public class WCFService : IWCFService
{
    public string SayHello(string name)
    {
        Console.WriteLine("Hello! {0}, Using string", name);
        return "Hello! " + name;
    }

    public string SayHelloToUser(User user)
    {
        Console.WriteLine("Hello! {0} {1}, Using DataContract", user.FirstName, user.LastName);
        return "Hello! " + user.FirstName + " " + user.LastName;
    }
}
控制序列化行為,僅標記 [DataMember] 的成員會被序列化:
[DataContract]
public struct User
{
    [DataMember]
    public string FirstName;

    public string MiddleName; // 不會被序列化傳遞

    [DataMember]
    public string LastName;
}
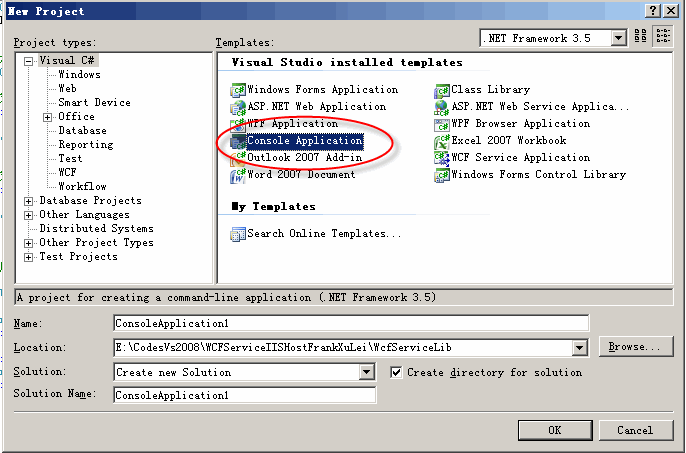
核心程式碼:建立 ServiceHost、註冊多協定基底位址、新增端點、開啟監聽:
using (ServiceHost host = new ServiceHost(typeof(WCFService.WCFService)))
{
    Uri tcpAddress = new Uri("net.tcp://localhost:8001/WCFService");
    Uri httpAddress = new Uri("https://localhost:8002/WCFService");
    Uri pipeAddress = new Uri("net.pipe://localhost:8002/WCFService");

    host.AddServiceEndpoint(typeof(WCFService.IWCFService), new NetTcpBinding(), tcpAddress);
    host.AddServiceEndpoint(typeof(WCFService.IWCFService), new WSHttpBinding(), httpAddress);
    host.AddServiceEndpoint(typeof(WCFService.IWCFService), new NetNamedPipeBinding(), pipeAddress);

    if (host.State != CommunicationState.Opening)
        host.Open();

    Console.WriteLine("Host is runing! and state is {0}", host.State);
    Console.Read(); // 阻塞執行緒維持服務運行
}
所有 WCF 設定置於 <system.serviceModel> 區段。
<service behaviorConfiguration="WCFService.WCFServiceBehavior" name="WCFService.WCFService">
  <endpoint address="https://localhost:8001/WCFService" binding="wsHttpBinding" contract="WCFService.IWCFService" />
  <endpoint address="net.tcp://localhost:8002/WCFService" binding="netTcpBinding" contract="WCFService.IWCFService" />
  <host>
    <baseAddresses>
      <add baseAddress="https://localhost:8001/" />
      <add baseAddress="net.tcp://localhost:8002/" />
    </baseAddresses>
  </host>
</service>
<endpoint address="mex" binding="mexHttpBinding" contract="IMetadataExchange" />
<endpoint address="mex" binding="mexTcpBinding" contract="IMetadataExchange" />
<behaviors>
  <serviceBehaviors>
    <behavior name="WCFService.WCFServiceBehavior">
      <serviceMetadata httpGetEnabled="true" />
      <serviceDebug includeExceptionDetailInFaults="false" />
    </behavior>
  </serviceBehaviors>
</behaviors>
行為名稱必須與服務 behaviorConfiguration 完全一致,否則執行時會拋出找不到行為的例外。
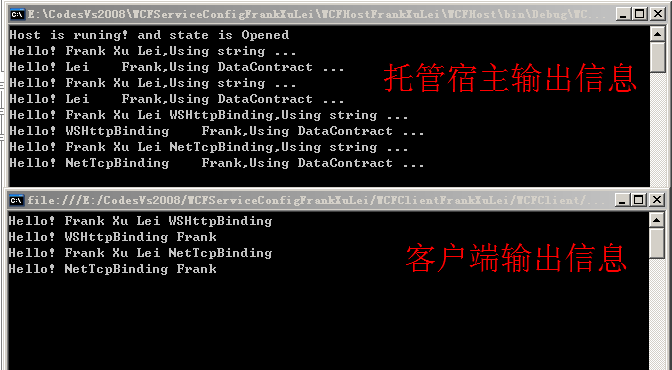
宿主啟動成功畫面:

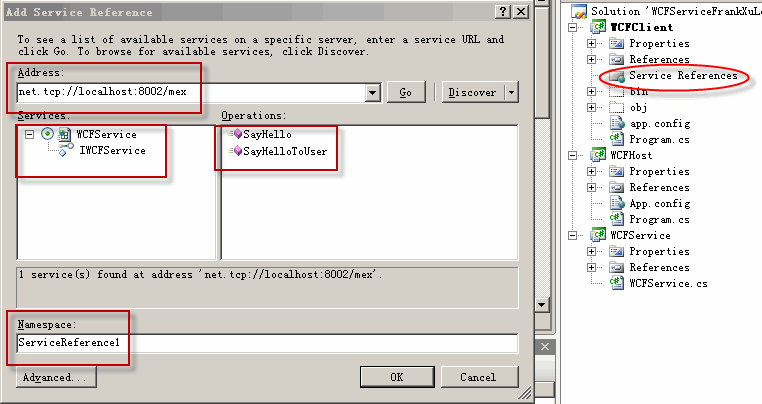
先啟動宿主,用戶端專案右鍵「加入服務參考」,輸入基底位址(如 net.tcp://localhost:8002/WCFService 或 https://localhost:8001/WCFService),分別命名為 ServiceReferenceTcp、ServiceReferenceHttp:
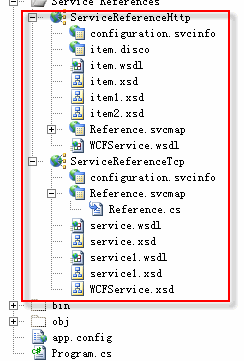
<client>
  <endpoint address="https://localhost:8001/WCFService" binding="wsHttpBinding" contract="ServiceReferenceTcp.IWCFService" name="WSHttpBinding_IWCFService" />
  <endpoint address="net.tcp://localhost:8002/WCFService" binding="netTcpBinding" contract="ServiceReferenceTcp.IWCFService" name="NetTcpBinding_IWCFService" />
  <endpoint address="https://localhost:8001/WCFService" binding="wsHttpBinding" contract="ServiceReferenceHttp.IWCFService" name="WSHttpBinding_IWCFService1" />
  <endpoint address="net.tcp://localhost:8002/WCFService" binding="netTcpBinding" contract="ServiceReferenceHttp.IWCFService" name="NetTcpBinding_IWCFService1" />
</client>
// HTTP 呼叫
ServiceReferenceHttp.WCFServiceClient proxyHttp = new ServiceReferenceHttp.WCFServiceClient("WSHttpBinding_IWCFService1");
Console.WriteLine(proxyHttp.SayHello("Frank Xu Lei WSHttpBinding"));

ServiceReferenceHttp.User userHttp = new ServiceReferenceHttp.User { FirstName = "WSHttpBinding", LastName = "Frank" };
Console.WriteLine(proxyHttp.SayHelloToUser(userHttp));

// TCP 呼叫
ServiceReferenceTcp.WCFServiceClient proxyTcp = new ServiceReferenceTcp.WCFServiceClient("NetTcpBinding_IWCFService");
Console.WriteLine(proxyTcp.SayHello("Frank Xu Lei NetTcpBinding"));

ServiceReferenceTcp.User userTcp = new ServiceReferenceTcp.User { FirstName = "NetTcpBinding", LastName = "Frank" };
Console.WriteLine(proxyTcp.SayHelloToUser(userTcp));
雙協定呼叫均成功回傳正確結果:
本文完整示範了自訂宿主 WCF 方案的全生命週期開發:服務契約定義、宿主程式碼與組態配置(含多協定端點與 MEX)、用戶端 Proxy 產生與多端點呼叫驗證。關鍵在於宿主必須正確配置中繼資料交換端點,否則用戶端無法透過「加入服務參考」取得中繼資料產生本地 Proxy。組態檔方式簡潔易維護,程式碼方式則提供執行期動態控制彈性,實務上可視專案需求選擇或混合使用。
本文配套原始碼下載