Kinect 的深度資料雖能提供場景幾何,但若要建立真正自然、豐富的互動體驗,必須進一步辨識「人」的結構。骨骼追蹤技術正是透過深度影像的機器學習分類,輸出 20 個關節點的 3D 座標,成為 NUI 開發的核心輸入來源。本文將系統介紹骨骼追蹤的四大核心物件(SkeletonStream、SkeletonFrame、Skeleton、Joint),並以完整 WPF 範例示範如何取得資料並繪製骨架。
private KinectSensor kinectDevice;
private Skeleton[] frameSkeletons;
private readonly Brush[] skeletonBrushes = { Brushes.Black, Brushes.Crimson, Brushes.Indigo, Brushes.DodgerBlue, Brushes.Purple, Brushes.Pink };

public MainWindow()
{
    InitializeComponent();
    KinectSensor.KinectSensors.StatusChanged += KinectSensors_StatusChanged;
    KinectDevice = KinectSensor.KinectSensors.FirstOrDefault(s => s.Status == KinectStatus.Connected);
}

public KinectSensor KinectDevice
{
    get => kinectDevice;
    set
    {
        if (kinectDevice != null)
        {
            kinectDevice.Stop();
            kinectDevice.SkeletonFrameReady -= KinectDevice_SkeletonFrameReady;
            kinectDevice.SkeletonStream.Disable();
            frameSkeletons = null;
        }
        kinectDevice = value;
        if (kinectDevice != null && kinectDevice.Status == KinectStatus.Connected)
        {
            kinectDevice.SkeletonStream.Enable();
            frameSkeletons = new Skeleton[kinectDevice.SkeletonStream.FrameSkeletonArrayLength]; // 固定長度 6
            kinectDevice.SkeletonFrameReady += KinectDevice_SkeletonFrameReady;
            kinectDevice.Start();
        }
    }
}
FrameSkeletonArrayLength 常數 = 6,Kinect 最多偵測 6 人,但同時完整追蹤僅 2 人。frameSkeletons 陣列避免每幀配置記憶體。private void KinectDevice_SkeletonFrameReady(object sender, SkeletonFrameReadyEventArgs e)
{
using (var frame = e.OpenSkeletonFrame())
{
if (frame == null) return;
LayoutRoot.Children.Clear(); // 簡單做法:每幀全清重繪
frame.CopySkeletonDataTo(frameSkeletons);
for (int i = 0; i < frameSkeletons.Length; i++)
{
var skeleton = frameSkeletons[i];
if (skeleton.TrackingState != SkeletonTrackingState.Tracked) continue; // 忽略未追蹤骨架
var brush = skeletonBrushes[i % skeletonBrushes.Length];
// 依解剖結構分段繪製 Polyline
DrawBone(brush, skeleton, JointType.Head, JointType.ShoulderCenter, JointType.ShoulderLeft, JointType.Spine, JointType.ShoulderRight, JointType.ShoulderCenter, JointType.HipCenter);
DrawBone(brush, skeleton, JointType.HipLeft, JointType.HipRight);
DrawBone(brush, skeleton, JointType.HipCenter, JointType.HipLeft, JointType.KneeLeft, JointType.AnkleLeft, JointType.FootLeft);
DrawBone(brush, skeleton, JointType.HipCenter, JointType.HipRight, JointType.KneeRight, JointType.AnkleRight, JointType.FootRight);
DrawBone(brush, skeleton, JointType.ShoulderLeft, JointType.ElbowLeft, JointType.WristLeft, JointType.HandLeft);
DrawBone(brush, skeleton, JointType.ShoulderRight, JointType.ElbowRight, JointType.WristRight, JointType.HandRight);
}
}
}
private void DrawBone(Brush brush, Skeleton skeleton, params JointType[] joints)
{
var polyline = new Polyline { Stroke = brush, StrokeThickness = 8 };
foreach (var jt in joints)
polyline.Points.Add(GetJointPoint(skeleton.Joints[jt]));
LayoutRoot.Children.Add(polyline);
}
private Point GetJointPoint(Joint joint)
{
var dp = KinectDevice.MapSkeletonPointToDepth(joint.Position, KinectDevice.DepthStream.Format);
dp.X = (int)(dp.X * LayoutRoot.ActualWidth / KinectDevice.DepthStream.FrameWidth);
dp.Y = (int)(dp.Y * LayoutRoot.ActualHeight / KinectDevice.DepthStream.FrameHeight);
return new Point(dp.X, dp.Y);
}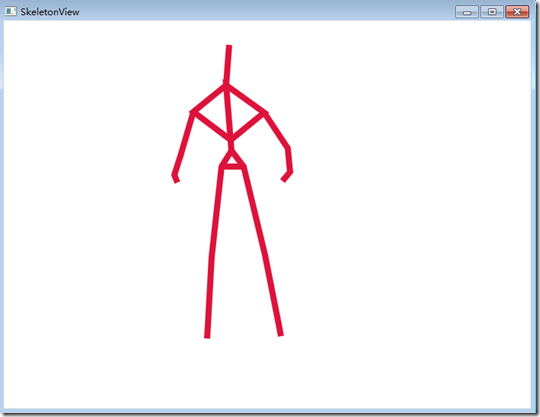
觀察重點: 執行時嘗試前後移動,骨架大小會隨 Z 值(深度)自然縮放,這證明
MapSkeletonPointToDepth內部已包含透視投影修正。若在GetJointPoint中強制將joint.Position.Z = 0,映射出的 X、Y 皆為 0,可驗證深度參與座標轉換。
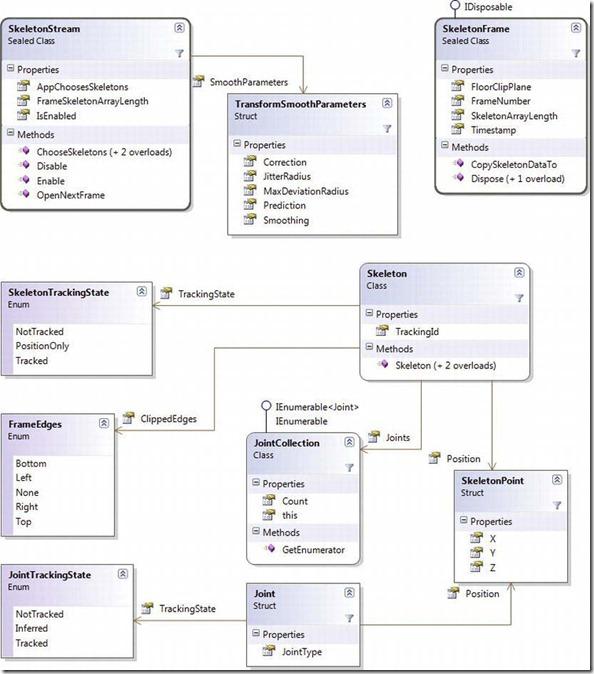
| 屬性/方法 | 說明 |
|---|---|
Enable() / Disable() | 啟用/停用骨骼串流。未啟用不會產生幀、事件不觸發。 |
Enable(TransformSmoothParameters) | 啟用並套用 Holt 雙指數平滑參數(見下表)。 |
IsSmoothingEnabled | 是否已套用平滑參數。 |
AppChoosesSkeletons | true 時由應用程式決定追蹤哪兩具骨架(需呼叫 ChooseSkeletons)。 |
ChooseSkeletons(params int[] trackingIds) | 指定要追蹤的 TrackingId;傳入空陣列則停止追蹤。 |
| 參數 | 範圍 | 效果 |
|---|---|---|
| Smoothing | 0~1 | 值越大越平滑,0=關閉。過大導致延遲感。 |
| Correction | 0~1 | 值越小修正越強,預測修正權重。 |
| Prediction | 幀數 | 預測未來幾幀位置,配合 Correction 使用。 |
| JitterRadius | 公尺 | 抖動半徑門檻,超過視為真實移動而非雜訊。 |
| MaxDeviationRadius | 公尺 | 最大偏離半徑,超過此範圍不視為抖動而直接採用新位置。 |
效能提醒: 平滑處理會增加 CPU 負載。建議依遊戲階段動態調整(如選單高平滑、動作遊戲低平滑)。
e.OpenSkeletonFrame()(事件模式)或 stream.OpenNextFrame()(Pull 模式)。CopySkeletonDataTo(Skeleton[]):深拷貝至預先配置陣列。每次呼叫產生全新 Skeleton 實例(參考不相等,但 TrackingId 相同)。FrameNumber:幀序號(非連續,遞增)。Timestamp:感測器啟動後毫秒數(64-bit)。FloorClipPlane:地面平面係數 (A,B,C,D),Ax+By+Cz+D=0;全 0 表無法判定。| 屬性 | 型別 | 說明 |
|---|---|---|
| TrackingId | int | 唯一追蹤編號(遞增、非連續、0 表無效佔位符)。 |
| TrackingState | SkeletonTrackingState | Tracked/PositionOnly/NotTracked。 |
| Position | SkeletonPoint | 骨架中心點(≈脊椎中點),可用於最近者篩選。 |
| ClippedEdges | FrameEdges (Flags) | 身體超出視野邊界標記:Bottom/Top/Left/Right。 |
| Joints | JointCollection | 20 個關節點集合,以 JointType 索引。 |
Bottom 時提示使用者後退或調整感測器俯仰角(KinectSensor.ElevationAngle,範圍 ±27°,每秒限制調整次數保護馬達)。Bottom;但 Left/Right 影響手部追蹤,建議提示使用者移至畫面中央。| 屬性 | 型別 | 說明 |
|---|---|---|
| JointType | enum | 20 種關節:Head, ShoulderCenter, ShoulderLeft/Right, ElbowLeft/Right, WristLeft/Right, HandLeft/Right, Spine, HipCenter, HipLeft/Right, KneeLeft/Right, AnkleLeft/Right, FootLeft/Right。 |
| Position | SkeletonPoint | X、Y、Z(公尺,骨骼座標系)。 |
| TrackingState | JointTrackingState | Tracked(高信心)、Inferred(推測、遮蔽時)、NotTracked。 |
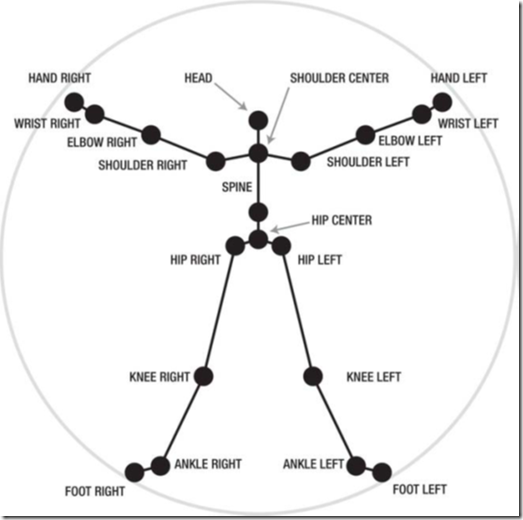
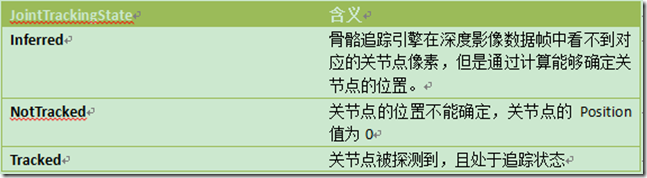
重要:
Inferred狀態表示關節被遮擋,位置由骨架約束推估,精度較低。應用程式視需求決定是否採用(如手部被身體遮擋時)。
本文建立了骨骼追蹤開發的完整知識骨架:
SkeletonStream.Enable() → 事件/拉模式取得 SkeletonFrame → CopySkeletonDataTo → 遍歷 Skeleton → 讀取 Joints。MapSkeletonPointToDepth)。下一篇將以「連連看」小遊戲為例,實戰演練手部追蹤判斷、命中測試、動態連線繪圖,並整理座標系轉換與鏡像處理細節,敬請期待!
作者:yangecnu(博客園)|原文連結:https://www.cnblogs.com/yangecnu/