FFmpeg 是跨平台音視頻處理的標準庫。在 Windows + Visual Studio 環境下建置開發環境,關鍵在於正確配置「標頭檔、匯入庫、執行期 DLL」三要素。本文以 VS2013 為例,提供可直接複製的逐步操作流程。
doc/examples 範例)。ffmpeg--win32-shared.7z → 解壓取得 bin/ 下的 avcodec-*.dll、avformat-*.dll、avutil-*.dll、swresample-*.dll 等執行期 DLL。ffmpeg--win32-dev.7z → 解壓取得 include/(標頭檔)與 lib/(匯入庫 *.lib)。⚠️ 若專案為 x64,請下載對應 64-bit Shared/Dev 套件,並將專案平台設為 x64。
ffmpeg-test。doc/examples/metadata.c 複製內容到 ffmpeg-test.cpp,微調:// 原始 metadata.c 為 C 風格,C++ 需加 extern "C" 包含標頭
extern "C" {
#include
#include
}
int main(int argc, char* argv[]) {
// 原範例邏輯:開啟媒體檔並打印 metadata
// 需自行傳入媒體檔路徑 argv[1]
}
| 屬性頁面 | 設定值 |
|---|---|
| C/C++ → General → Additional Include Directories | $(SolutionDir)..\ffmpeg-dev\include |
| Linker → General → Additional Library Directories | $(SolutionDir)..\ffmpeg-dev\lib |
| Linker → Input → Additional Dependencies | avformat.lib;avutil.lib;avcodec.lib;swresample.lib |
| C/C++ → Code Generation → Runtime Library | Multi-threaded DLL (/MD) 或 /MDd(需與 FFmpeg 建置模式一致) |
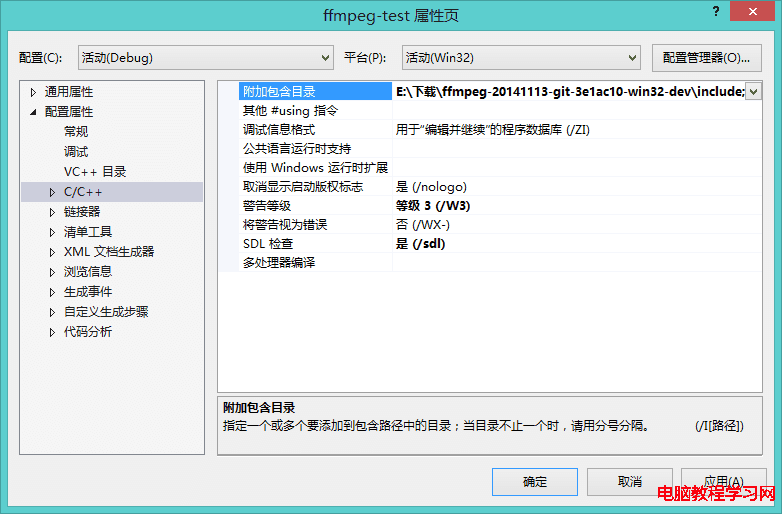
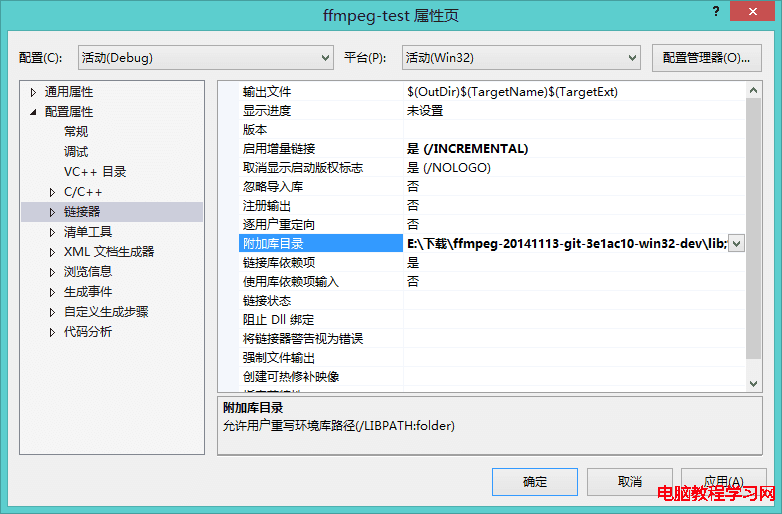
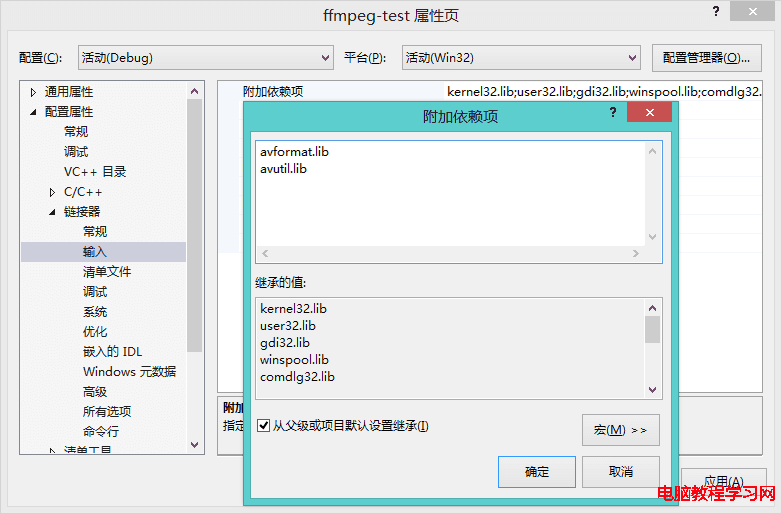
將 32-bit Shared 包 bin/ 目錄下所有 *.dll 複製到專案輸出目錄(與 .exe 同層,即 ffmpeg-test/ 下)。
ffmpeg-test.sln
ffmpeg-test/
  ├── ffmpeg-test.vcxproj
  ├── ffmpeg-test.cpp
  ├── avcodec-58.dll
  ├── avformat-58.dll
  ├── avutil-56.dll
  ├── swresample-3.dll
  └── ... (其他 DLL)
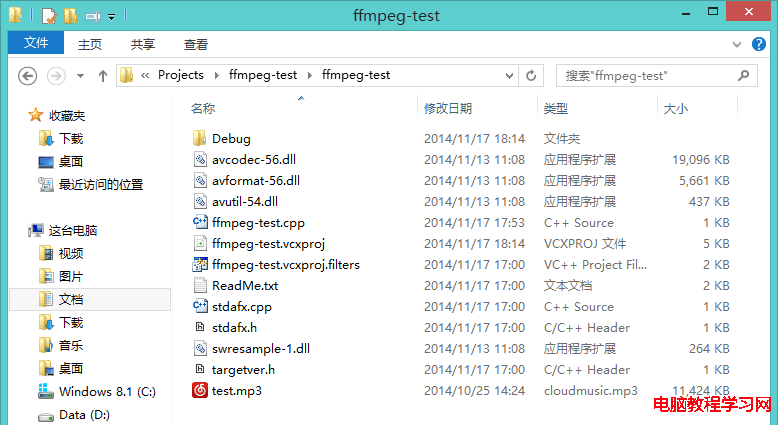
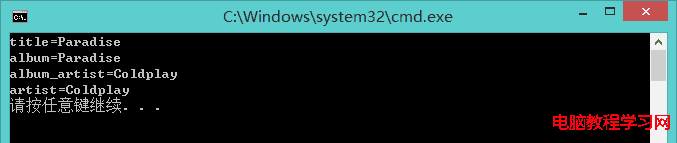
| 錯誤現象 | 原因與對策 |
|---|---|
LNK2019 未解析的外部符號 av_* | Library 目錄或 Additional Dependencies 未正確設定,或 32/64 位元不匹配。 |
| 執行時彈窗「找不到 avformat-58.dll」 | DLL 未放在 exe 同目錄,或 PATH 未包含 DLL 目錄。 |
C4996 avcodec_alloc_frame 已棄用 | 改用 av_frame_alloc(),參見下一篇文章。 |
| Runtime Library 不匹配(/MT vs /MD) | 專案與 FFmpeg 必須同為 /MD(動態 CRT)或同為 /MT(靜態 CRT)。 |
現代專案建議採用 vcpkg install ffmpeg:x86-windows 或 Conan 自動抓取預建二進制,CMakeLists.txt 僅需 find_package(FFmpeg REQUIRED) 即可自動配置 Include/Lib/DLL,避免手動設定錯誤。