最近因科研需求,我深入研究 Google 開源的 RE2 正則表達式庫。這個龐大的 C++ 代碼庫對於習慣 Java 的我來說頗具挑戰,每天只能啃一點點。今天研究了其中的測試方法,感覺設計得很不錯,特此分享給大家(C++ 大牛請輕噴)。
對於 C++ 初學者,平時寫幾個函數測試通常直接在 main 函數中一個個調用。但對於真實項目,方法眾多,若仍在 main 中逐一測試,不僅效率低下,還容易遺漏錯誤。雖然市面上有許多 C++ 自動化測試工具,但我未曾使用,無法評價。這裡我將介紹 Google 在 RE2 庫中採用的測試方案。
該方案通過宏和靜態對象構造函數,在程序啟動前自動將測試用例註冊到全局數組,然後在 main 中統一執行。以下用簡單例子說明:測試兩個函數 getAsciiNum() 和 getNonAsciiNum(),分別統計字符串中 ASCII 和非 ASCII 字符數量。
// test.h
#define TEST(x, y) \
    void x##y(void); \
    TestRegisterer r##x##y(x##y, #x "." #y); \
    void x##y(void)

void RegisterTest(void (*)(void), const char*);

class TestRegisterer {
public:
    TestRegisterer(void (*fn)(void), const char *s) {
        RegisterTest(fn, s);
    }
};
解析:
TestRegisterer 類的構造函數接受函數指針和描述字符串,調用 RegisterTest 進行註冊。TEST(x, y) 展開為:前向聲明測試函數、創建靜態 TestRegisterer 對象(構造時自動註冊)、以及測試函數定義的起始大括號。x##y 視為未定義的函數名而報錯。#include <string>
#include <vector>
#include "test.h"
#define arraysize(array) (sizeof(array)/sizeof((array)[0]))
#define CHECK_EQ(x, y) if((x) != (y)) { printf("test failed!\n"); system("pause"); exit(0); }
struct TestFlow {
const char* flow;
const int num;
};
static struct TestFlow tests1[] = {
{"\x02\x97\xa4\xe6\xfe\x0c", 2},
{"\x05\x97\x35\xe6\xfe\xac\x04", 3},
{"\xb2\x97\xa5\xe6\x9c\x1c\x58\xaa\x97\x03", 3},
{"\x32\x97\xa5\x05\x9c\xac\xe8\xaa\x57", 3},
{"\x42\x01\xa5\x86\x0c\x56\xe8\xaa\x97\x03", 5},
};
static struct TestFlow tests2[] = {
{"\x02\x97\xa4\xe6\xfe\x0c", 4},
{"\x05\x97\x35\xe6\xfe\xac\x04", 4},
{"\xb2\x97\xa5\xe6\x9c\x1c\x58\xaa\x97\x03", 7},
{"\x32\x97\xa5\x05\x9c\xac\xe8\xaa\x57", 6},
{"\x42\x01\xa5\x86\x0c\x56\xe8\xaa\x97\x03", 5},
};
int getAsciiNum(const char*);
int getNonAsciiNum(const char*);
TEST(TestAsciiNum, Simple) {
int failed = 0;
for (int i = 0; i < arraysize(tests1); i++) {
const TestFlow& t = tests1[i];
int num = getAsciiNum(t.flow);
if (num != t.num) failed++;
}
CHECK_EQ(failed, 0);
}
TEST(TestNonAsciiNum, Simple) {
int failed = 0;
for (int i = 0; i < arraysize(tests2); i++) {
const TestFlow& t = tests2[i];
int num = getNonAsciiNum(t.flow);
if (num != t.num) failed++;
}
CHECK_EQ(failed, 0);
}
// 被測試函數實現
int getAsciiNum(const char* flow) {
int num = 0, i;
for(i = 0; i < strlen(flow); i++) {
if(flow[i] >= 0 && flow[i] < 128) num++;
}
return num;
}
int getNonAsciiNum(const char* flow) {
int num = 0, i;
for(i = 0; i < strlen(flow); i++) {
if(flow[i] < 0 || flow[i] >= 128) num++;
}
return num;
}測試用例通過 TEST 宏定義,宏展開後會自動生成註冊代碼。例如 TEST(TestAsciiNum, Simple) 展開為:
void TestAsciiNumSimple(void);
TestRegisterer rTestAsciiNumSimple(TestAsciiNumSimple, "TestAsciiNum.Simple");
void TestAsciiNumSimple(void) { ... }// test.cpp
#include <stdio.h>
#include <stdlib.h>
#include "test.h"
struct Test {
void (*fn)(void);
const char *name;
};
static Test tests[10000];
static int ntests;
void RegisterTest(void (*fn)(void), const char *name) {
tests[ntests].fn = fn;
tests[ntests++].name = name;
}
int main(int argc, char **argv) {
for (int i = 0; i < ntests; i++) {
printf("%s\n", tests[i].name);
tests[i].fn();
}
printf("PASS\n");
system("pause");
return 0;
}關鍵點:
Test 結構體存儲測試函數指針和名稱,最多支持 10000 個測試。ntests 記錄實際註冊的測試數量。RegisterTest 將測試信息存入全局數組。main 遍歷數組,依次打印名稱並執行測試函數。這是靜態初始化的魔力。所有測試用例都在 TEST 宏中定義,宏展開會創建全局 TestRegisterer 對象。C++ 標準保證全局對象的構造函數在 main 進入前執行。構造函數調用 RegisterTest,將測試函數註冊到數組,因此進入 main 時 ntests 已經是 2。
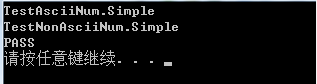
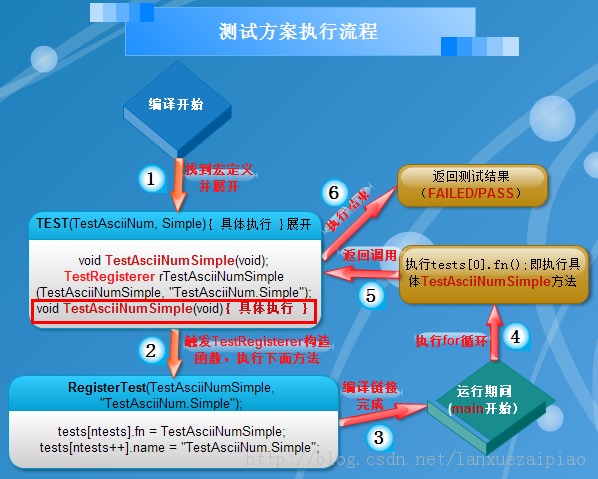
這種方案利用 C++ 靜態初始化機制實現測試用例的自動註冊,無需手動維護測試列表,代碼簡潔且擴展性強。雖然簡單,但體現了 Google 庫的工程智慧,值得借鑑。