單鏈表反轉是經典面試題,本文通過圖解詳細對比三種核心算法:三指針迭代法、頭插法、遞歸法,附完整 C++ 代碼。
struct ActList {
    char ActName[20];
    char Director[20];
    int Mtime;
    ActList *next;
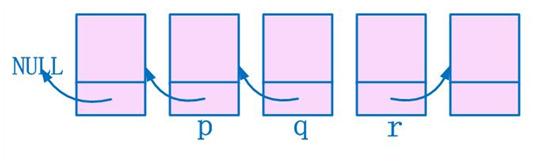
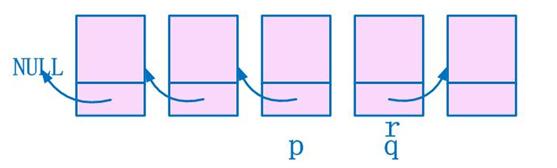
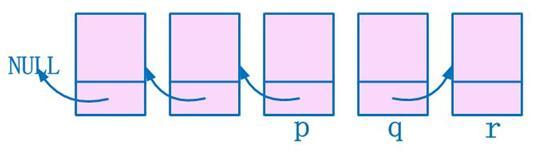
};核心思想:維護 prev、curr、next 三指針,逐個反轉 next 指向。
圖解步驟
p=head, q=head->next, head->next=NULLr=q->next; q->next=p; p=q; q=r;p 為新頭節點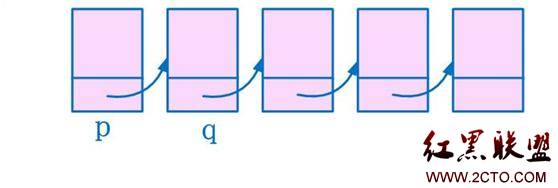
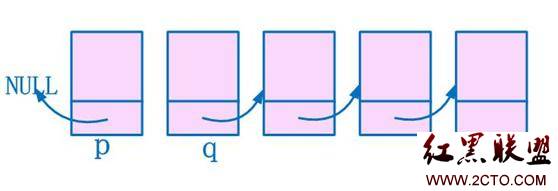
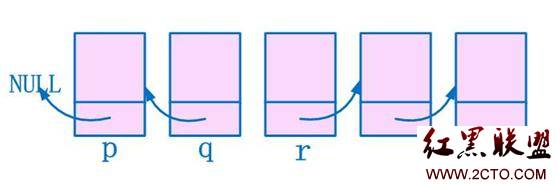
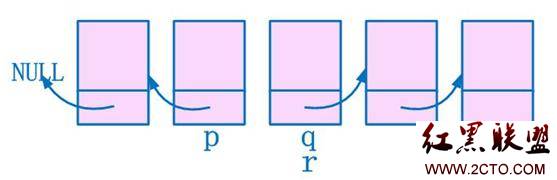
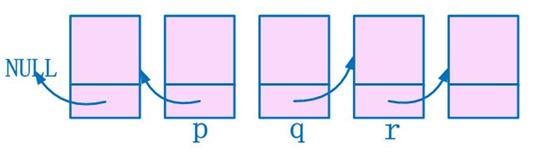
代碼實現
ActList* ReverseList2(ActList* head) {
    if (!head || !head->next) return head;
    ActList *p = head, *q = head->next, *r = nullptr;
    head->next = nullptr;  // 斷開首節點

    while (q) {
        r = q->next;   // 保存後續鏈表
        q->next = p;   // 反轉指針
        p = q;         // 前移
        q = r;
    }
    return p;  // p 為新頭節點
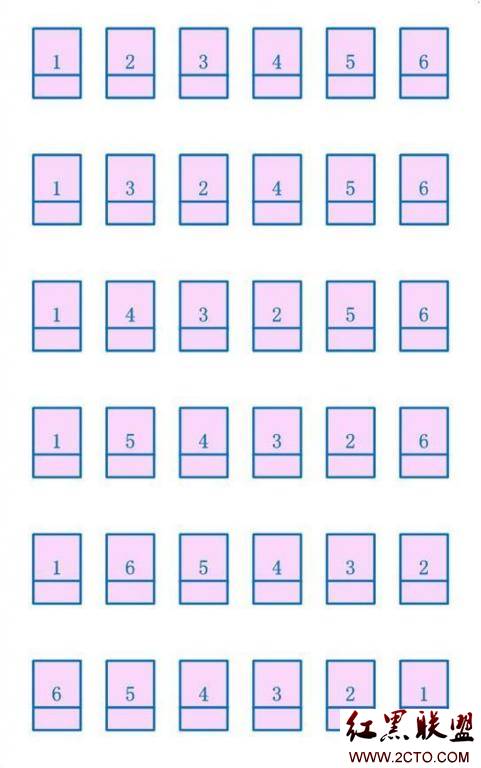
}核心思想:將第 2~N 個節點依次插入到頭節點之後,最後將原頭節點移至尾部。
圖解
代碼實現
ActList* ReverseList3(ActList* head) {
    if (!head || !head->next) return head;
    ActList *p = head->next, *q;

    while (p->next) {
        q = p->next;          // q 為待插入節點
        p->next = q->next;    // p 跳過 q
        q->next = head->next; // q 插入頭節點後
        head->next = q;
    }
    // 最後處理:原頭節點移至尾部
    p->next = head;           // 形成環
    head = p->next->next;     // 新頭節點
    p->next->next = nullptr;  // 斷開環
    return head;
}ActList* ReverseListRecursive(ActList* head) {
if (!head || !head->next) return head;
ActList* newHead = ReverseListRecursive(head->next);
head->next->next = head; // 反轉指針
head->next = nullptr;
return newHead;
}#include
using namespace std;
struct ActList { /* 同上 */ };
ActList* Create() { /* 交互式創建鏈表 */ }
void DisplayList(ActList* head) { /* 遍歷輸出 */ }
// 三種反轉函數:ReverseList2, ReverseList3, ReverseListRecursive
int main() {
ActList* head = Create();
DisplayList(head);
DisplayList(ReverseList3(head)); // 測試頭插法
return 0;
} | 算法 | 時間 | 空間 | 優點 | 缺點 |
|---|---|---|---|---|
| 三指針迭代 | O(n) | O(1) | 標準、易理解、無棧溢出風險 | 指針操作稍繁瑣 |
| 頭插法 | O(n) | O(1) | 邏輯直觀、無需額外 prev 指針 | 最後環處理易出錯 |
| 遞歸 | O(n) | O(n) | 代碼極簡、函數式風格 | 長鏈表棧溢出、效率略低 |
掌握鏈表反轉三大算法,不僅應對面試,更能鍛鍊指針操作的邏輯嚴密性。