Spring MVC 是 Spring 框架中用於構建 Web 應用程式的核心模組,採用 MVC(Model-View-Controller)設計模式,將業務邏輯、資料展示與控制流程分離。本文將詳細介紹如何從零開始搭建一個 Spring MVC 專案,包含專案結構規劃、核心配置檔案編寫、控制器實現與視圖渲染等關鍵步驟。
在動手實作前,先理解 Spring MVC 的請求處理流程:
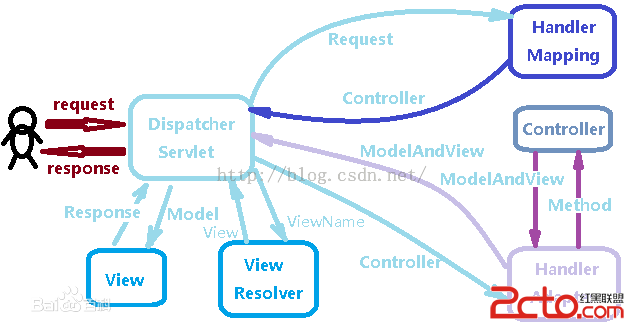
核心組件說明:
建立標準 Maven Web 專案結構,並在 src/main/resources 下建立 config 資料夾存放配置檔案。
<web-app version="2.5" xmlns="https://java.sun.com/xml/ns/javaee"
    xmlns:xsi="https://www.w3.org/2001/XMLSchema-instance"
    xsi:schemaLocation="https://java.sun.com/xml/ns/javaee
    https://java.sun.com/xml/ns/javaee/web-app_2_5.xsd">
    <display-name>SpringMVCDemo</display-name>
    <welcome-file-list>
        <welcome-file>index.jsp</welcome-file>
    </welcome-file-list>

    <!-- 配置 Spring MVC 前端控制器 -->
    <servlet>
        <servlet-name>SpringMVC</servlet-name>
        <servlet-class>org.springframework.web.servlet.DispatcherServlet</servlet-class>
        <!-- 指定 Spring MVC 配置檔案路徑 -->
        <init-param>
            <param-name>contextConfigLocation</param-name>
            <param-value>classpath:applicationContext-mvc.xml</param-value>
        </init-param>
        <load-on-startup>1</load-on-startup>
    </servlet>

    <servlet-mapping>
        <servlet-name>SpringMVC</servlet-name>
        <!-- 攔截以 .action 結尾的請求 -->
        <url-pattern>*.action</url-pattern>
    </servlet-mapping>
</web-app>
<beans xmlns="https://www.springframework.org/schema/beans"
    xmlns:aop="https://www.springframework.org/schema/aop"
    xmlns:context="https://www.springframework.org/schema/context"
    xmlns:mvc="https://www.springframework.org/schema/mvc"
    xmlns:xsi="https://www.w3.org/2001/XMLSchema-instance"
    xsi:schemaLocation="
        https://www.springframework.org/schema/beans https://www.springframework.org/schema/beans/spring-beans-4.0.xsd
        https://www.springframework.org/schema/aop https://www.springframework.org/schema/aop/spring-aop-4.0.xsd
        https://www.springframework.org/schema/context https://www.springframework.org/schema/context/spring-context-4.0.xsd
        https://www.springframework.org/schema/mvc https://www.springframework.org/schema/mvc/spring-mvc-4.0.xsd">

    <!-- 開啟組件掃描,自動註冊 @Controller 等註解標記的 Bean -->
    <context:component-scan base-package="com.mvc" />

    <!-- 手動註冊 Handler(也可使用註解方式) -->
    <bean class="com.mvc.action.HelloAction" name="/hello.action"></bean>

    <!-- 處理器映射器:根據 Bean 名稱映射 URL -->
    <bean class="org.springframework.web.servlet.handler.BeanNameUrlHandlerMapping"></bean>

    <!-- 處理器適配器:支援 Controller 介面實現類 -->
    <bean class="org.springframework.web.servlet.mvc.SimpleControllerHandlerAdapter"></bean>

    <!-- 視圖解析器:配置 JSP 視圖路徑前綴與後綴 -->
    <bean class="org.springframework.web.servlet.view.InternalResourceViewResolver">
        <property name="viewClass" value="org.springframework.web.servlet.view.JstlView" />
        <property name="prefix" value="/WEB-INF/jsp/" />
        <property name="suffix" value=".jsp" />
    </bean>

    <!-- 開啟註解驅動,支援 @RequestMapping 等註解 -->
    <mvc:annotation-driven />
</beans>
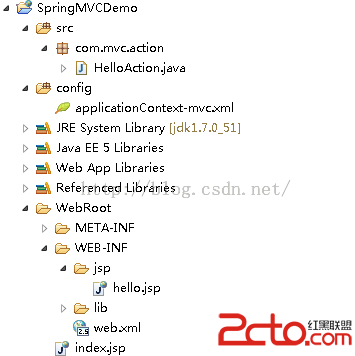
搭建 Spring MVC 專案需要引入以下核心依賴(建議使用 Maven 管理):
| Jar 包 | 功能描述 | 主要依賴 |
|---|---|---|
| spring-core.jar | 核心工具類,所有模組基礎 | commons-logging |
| spring-beans.jar | IoC/DI 容器核心實現 | spring-core, cglib |
| spring-context.jar | ApplicationContext、驗證、JNDI 等擴展 | spring-beans, spring-aop |
| spring-web.jar | Web 應用核心支援,含檔案上傳、Filter 等 | spring-context, Servlet API |
| spring-webmvc.jar | Spring MVC 框架實現,含 Servlet、Controller、View | spring-web, spring-context |
| spring-aop.jar | AOP 實現,支援聲明式事務 | spring-beans, aopalliance, cglib |
| aopalliance.jar | AOP 聯盟標準介面 | - |
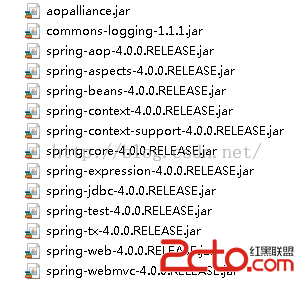
依賴關係總結: spring-core 為基礎 → spring-beans → spring-aop → spring-context → spring-web → spring-webmvc。實際開發中強烈建議使用 Maven 或 Gradle 自動管理傳遞性依賴。
package com.mvc.action;

import javax.servlet.http.HttpServletRequest;
import javax.servlet.http.HttpServletResponse;
import org.springframework.web.servlet.ModelAndView;
import org.springframework.web.servlet.mvc.Controller;

public class HelloAction implements Controller {
    @Override
    public ModelAndView handleRequest(HttpServletRequest request, HttpServletResponse response) throws Exception {
        String message = "Hello World! Spring MVC 搭建成功!";

        ModelAndView modelAndView = new ModelAndView();
        // 設定模型資料,相當於 request.setAttribute()
        modelAndView.addObject("message", message);
        // 設定邏輯視圖名,經 ViewResolver 解析為 /WEB-INF/jsp/hello.jsp
        modelAndView.setViewName("hello");

        return modelAndView;
    }
}
package com.mvc.action;

import org.springframework.stereotype.Controller;
import org.springframework.web.bind.annotation.RequestMapping;
import org.springframework.web.bind.annotation.ResponseBody;
import org.springframework.ui.Model;

@Controller
@RequestMapping("/hello")
public class HelloController {

    @RequestMapping("/world.action")
    public String helloWorld(Model model) {
        model.addAttribute("message", "Hello World! 使用註解式開發更簡潔");
        return "hello";  // 邏輯視圖名
    }

    @RequestMapping("/api/message")
    @ResponseBody
    public String apiMessage() {
        return "{\"message\": \"REST API 回傳 JSON\"}";
    }
}
<%@ page language="java" contentType="text/html; charset=UTF-8" pageEncoding="UTF-8"%>
<%@ taglib prefix="c" uri="https://java.sun.com/jsp/jstl/core" %>
<!DOCTYPE html>
<html>
<head>
    <meta charset="UTF-8">
    <title>Spring MVC 入門範例</title>
</head>
<body>
    <h1>Spring MVC 測試頁面</h1>
    <p>伺服器回傳訊息:<strong>${message}</strong></p>
    <hr/>
    <p>當前時間:${new java.util.Date()}</p>
</body>
</html>
https://localhost:8080/專案名/hello.action(傳統模式)或 https://localhost:8080/專案名/hello/world.action(註解模式)至此,一個基礎的 Spring MVC 專案已搭建完成。掌握核心配置原理後,建議逐步遷移至 Spring Boot 以獲得更高的開發效率與生產級預設配置。