Spring 2.5 引入註解支持,徹底改變了 Controller 開發方式:無需實現特定介面、無需在 XML 中逐一定義 Bean 與 URL 映射,僅需幾個核心註解即可完成請求路由、參數綁定、視圖解析。
| 註解 | 作用位置 | 核心功能 |
|---|---|---|
| @Controller | 類 | 標識 Spring MVC 控制器,自動被組件掃描註冊為 Bean。 |
| @RequestMapping | 類/方法 | 定義 URL 映射路徑,支援 method、params、headers、consumes/produces 細粒度匹配。 |
| @RequestParam | 方法參數 | 綁定請求參數,支援 required、defaultValue。 |
| @PathVariable | 方法參數 | 綁定 URI 模板變量(REST 風格)。 |
| @ModelAttribute | 方法/參數 | 綁定表單對象到模型,或預先放入模型數據。 |
| @ResponseBody | 方法 | 直接輸出返回值為響應體(JSON/XML),配合 `HttpMessageConverter`。 |
<!-- web.xml -->
<servlet>
  <servlet-name>springmvc</servlet-name>
  <servlet-class>org.springframework.web.servlet.DispatcherServlet</servlet-class>
  <init-param>
    <param-name>contextConfigLocation</param-name>
    <param-value>classpath:spring-mvc.xml</param-value>
  </init-param>
</servlet>
<servlet-mapping>
  <servlet-name>springmvc</servlet-name>
  <url-pattern>*.do</url-pattern>
</servlet-mapping>
<!-- spring-mvc.xml -->
<context:component-scan base-package="com"/> <!-- 掃描 @Controller -->

<bean id="viewResolver" class="org.springframework.web.servlet.view.InternalResourceViewResolver">
  <property name="prefix" value="/WEB-INF/jsp/"/>
  <property name="suffix" value=".jsp"/>
</bean>

<!-- 註解驅動核心(Spring 3.0+ 建議用 mvc:annotation-driven 替代) -->
<bean class="org.springframework.web.servlet.mvc.annotation.DefaultAnnotationHandlerMapping"/>
<bean class="org.springframework.web.servlet.mvc.annotation.AnnotationMethodHandlerAdapter"/>
@RequestMapping("/list")
public ModelAndView list() {
    ModelAndView mav = new ModelAndView(); // 無參構造,稍後設置 view/model
    mav.addObject("studentList", studentList); // 向模型放入數據
    mav.setViewName("student/list"); // 邏輯視圖名 -> /WEB-INF/jsp/student/list.jsp
    return mav;
}
添加模型數據的三種方式:
Controller:
@Controller
@RequestMapping("/student")
public class StudentController {
    private static List<Student> studentList = new ArrayList<>();
    static {
        studentList.add(new Student(1, "張三", 11));
        studentList.add(new Student(2, "李四", 12));
        studentList.add(new Student(3, "王五", 13));
    }

    @RequestMapping("/list")
    public ModelAndView list() { ... }

    @RequestMapping("/preSave")
    public ModelAndView preSave(@RequestParam(value="id", required=false) String id) {
        ModelAndView mav = new ModelAndView();
        if (id != null) {
            mav.addObject("student", studentList.get(Integer.parseInt(id)-1));
            mav.setViewName("student/update");
        } else {
            mav.setViewName("student/add");
        }
        return mav;
    }
}
JSP 視圖(使用 JSTL `
<%@ taglib prefix="c" uri="https://java.sun.com/jsp/jstl/core"%>
<table>
  <c:forEach var="student" items="${studentList}">
    <tr>
      <td>${student.id}</td>
      <td>${student.name}</td>
      <td>${student.age}</td>
      <td><a href="preSave.do?id=${student.id}">修改</a></td>
    </tr>
  </c:forEach>
</table>
訪問 `https://localhost:8080/SpringMvc02/` 自動重定向到列表頁,點擊「添加/修改」跳轉對應表單,流程打通。
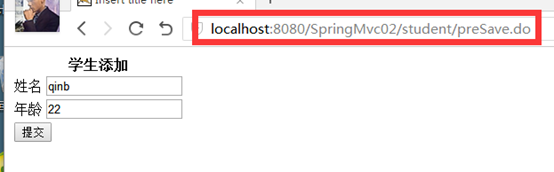
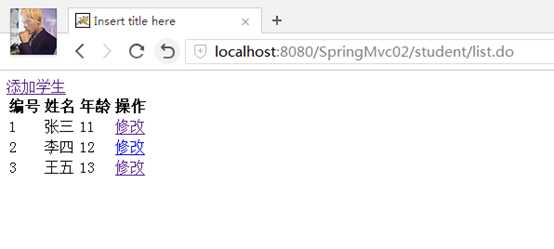
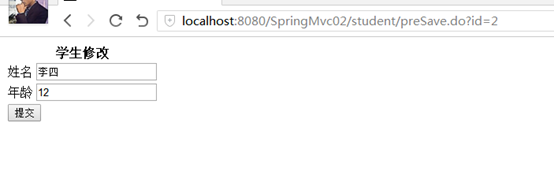
下篇將實現 `save.do` 處理表單提交,講解 `@ModelAttribute` 數據綁定與 `BindingResult` 校驗。