帶柔和陰影與帶光暈的文字特效,底層技術完全相同,僅參數設定不同。關鍵在於 GDI+ 的插值模式:位圖放大時,插值模式決定像素如何與周圍融合。低品質僅複製單色塊;高品質雙線性(InterpolationModeHighQualityBilinear)與高品質雙三次(InterpolationModeHighQualityBicubic)會考慮平滑與反鋸齒,實測雙三次效果最佳。
GraphicsPath,加入目標文字路徑。Graphics,套用縮放矩陣(Matrix(1/5, 0, 0, 1/5, -1/5, -1/5)),使後續繪製自動縮小 5 倍。SmoothingModeAntiAlias,以光暈顏色(如黃色)填充路徑,並用細筆繪製輪廓增強邊緣。Graphics,設定 InterpolationModeHighQualityBicubic,將光暈位圖放大 5 倍繪製至目標區域,邊緣自然形成模糊光暈。void CTextHaloEffectView::OnDraw(CDC* pDC)
{
CTextHaloEffectDoc* pDoc = GetDocument();
ASSERT_VALID(pDoc);
if (!pDoc) return;
// 客戶區尺寸
CRect ClientRect; GetClientRect(&ClientRect);
CSize ClientSize(ClientRect.Width(), ClientRect.Height());
using namespace Gdiplus;
Graphics g(pDC->m_hDC);
RectF ClientRectangle(ClientRect.left, ClientRect.top, ClientRect.Width(), ClientRect.Height());
// 底色填黑
g.FillRectangle(&SolidBrush(Color::Black), ClientRectangle);
// 1/5 光暈位圖
Bitmap bm(ClientSize.cx / 5, ClientSize.cy / 5, &g);
// 文字路徑
GraphicsPath pth;
int style = FontStyleRegular;
pth.AddString(L"文字光圈", -1, &FontFamily(L"宋體"), style, 100, Point(20, 20), NULL);
// 光暈位圖 Graphics
Graphics* bmpg = Graphics::FromImage(&bm);
Matrix mx(1.0f/5, 0, 0, 1.0f/5, -(1.0f/5), -(1.0f/5));
bmpg->SetSmoothingMode(SmoothingModeAntiAlias);
bmpg->SetTransform(&mx); // 縮放變換
// 繪製光暈:黃色輪廓 + 填充
Pen p(Color::Yellow, 3);
bmpg->DrawPath(&p, &pth);
bmpg->FillPath(&SolidBrush(Color::Yellow), &pth);
// 目標 Graphics 設定
g.SetTransform(&Matrix(1, 0, 0, 1, 50, 50)); // 位移避免邊緣切割
g.SetSmoothingMode(SmoothingModeAntiAlias);
g.SetInterpolationMode(InterpolationModeHighQualityBicubic); // 關鍵:高品質雙三次
// 放大光暈位圖至目標
g.DrawImage(&bm, ClientRectangle, 0, 0, bm.GetWidth(), bm.GetHeight(), UnitPixel);
// 繪製實體文字(黑色)
g.FillPath(&SolidBrush(Color::Black), &pth);
}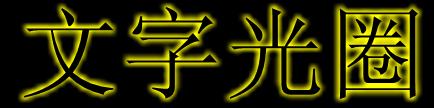
圖 1:光暈文字效果圖
為便於未安裝 GDI+ 的環境執行,原始碼已內嵌 gdiplus.dll,使用時僅需將 DLL 複製至系統路徑($PATH)即可。