PureMVC 是一個輕量級 MVC 框架,源自 Flex 社群,後移植至 Java、C#、Python 等多語言。其核心目標:將應用分離為低耦合的 Model、View、Controller 三層,透過單例 Facade 統一通訊。本文以 Swing 桌面應用為例,詳細解析 PureMVC 運作機制與實作要點。
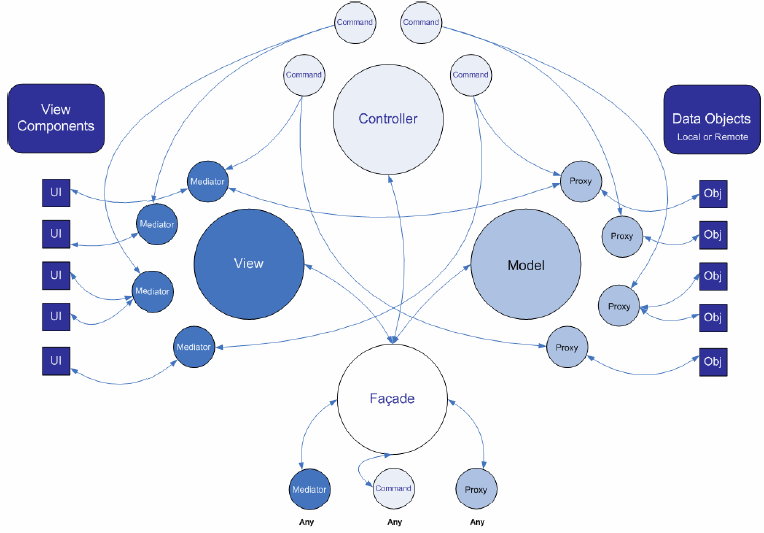
四大核心角色(皆為單例):
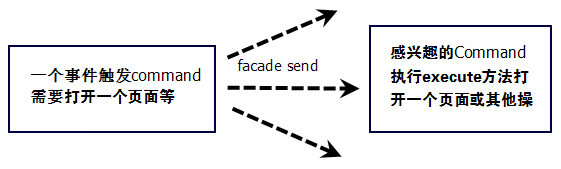
// 發送通知的標準方法
public void sendNotification(String notificationName, Object body, String type);
// notificationName: 常量字串,如 "LOGIN_SUCCESS"
// body: 任意傳遞資料 (Map, VO, DTO 等)
// type: 可選標識
public class ApplicationFacade extends Facade {
    private static ApplicationFacade instance;

    protected ApplicationFacade() { super(); }

    public static ApplicationFacade getInstance() {
        if (instance == null) instance = new ApplicationFacade();
        return instance;
    }

    @Override
    protected void initializeController() {
        super.initializeController();
        // 註冊啟動命令
        registerCommand(ApplicationConstants.INIT_START, InitStartCommand.class);
    }

    public void startup() {
        sendNotification(ApplicationConstants.INIT_START, null, null);
    }
}
public class InitStartCommand extends SimpleCommand {
    @Override
    public void execute(INotification notification) {
        // 註冊後續所有業務命令
        registerCommand(ApplicationConstants.SHOW_FRAME_01, ShowFrameCommand.class);
        registerCommand(ApplicationConstants.SHOW_FRAME_02, ShowFrameCommand.class);
        registerCommand(ApplicationConstants.LOGIN, LoginCommand.class);
        // ... 其他命令
    }
}

public class ShowFrameCommand extends SimpleCommand {
    @Override
    public void execute(INotification notification) {
        String cmdName = notification.getName();
        if (ApplicationConstants.SHOW_FRAME_01.equals(cmdName)) {
            doShowFrame01();
        } else if (ApplicationConstants.SHOW_FRAME_02.equals(cmdName)) {
            doShowFrame02();
        }
    }
}
public class MainFrameMediator extends Mediator {
    public static final String NAME = "MainFrameMediator";
    private MainFrame mainFrame;

    public MainFrameMediator(MainFrame viewComponent) {
        super(NAME, viewComponent);
        mainFrame = (MainFrame) viewComponent;
        // 綁定 UI 事件發送通知
        mainFrame.getMenuFrame01().addActionListener(e ->
            facade.sendNotification(ApplicationConstants.SHOW_FRAME_01));
    }

    @Override
    public String[] listNotificationInterests() {
        return new String[] {
            ApplicationConstants.LOGIN_SUCCESS,
            ApplicationConstants.CREATE_FRAME,
            ApplicationConstants.EXIT,
            ApplicationConstants.SEND_TO_FRAME_01,
            ApplicationConstants.SEND_TO_FRAME_02
        };
    }

    @Override
    public void handleNotification(INotification notification) {
        switch (notification.getName()) {
            case ApplicationConstants.LOGIN_SUCCESS:
                doLoginSuccess(notification);
                break;
            case ApplicationConstants.SEND_TO_FRAME_01:
                forwardToFrame01(notification);
                break;
            // ...
        }
    }
}
public class UserProxy extends Proxy {
    public static final String NAME = "UserProxy";
    private UserVO userData;

    public UserProxy() { super(NAME); }

    public void setUserData(UserVO vo) { this.userData = vo; }
    public UserVO getUserData() { return userData; }
}
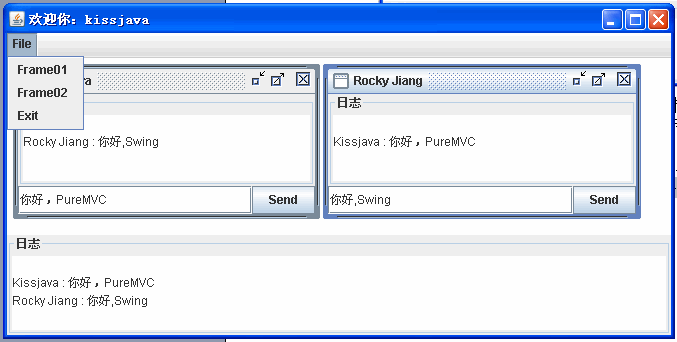
ApplicationFacade.getInstance().startup() 發送 INIT_STARTLOGIN → LoginCommand 驗證 → 發送 LOGIN_SUCCESS (攜帶用戶資料)MainFrameMediator 接收 LOGIN_SUCCESS 顯示主視窗SHOW_FRAME_01/02 → Command 建立 JInternalFrame 並註冊對應 MediatorSEND_TO_FRAME_02 → Frame02 Mediator 與 MainFrame Mediator 同時接收處理public class ApplicationConstants {
public static final String INIT_START = "initStart";
public static final String LOGIN = "login";
public static final String LOGIN_SUCCESS = "loginSuccess";
public static final String SHOW_FRAME_01 = "showFrame01";
public static final String SHOW_FRAME_02 = "showFrame02";
public static final String SEND_TO_FRAME_01 = "sendToFrame01";
public static final String SEND_TO_FRAME_02 = "sendToFrame02";
public static final String CREATE_FRAME = "createFrame";
public static final String EXIT = "exit";
}
facade.removeMediator(), facade.removeProxy())SwingUtilities.invokeLater)src/
├── com.myapp/
│ ├── facade/ # ApplicationFacade
│ ├── controller/ # Commands
│ ├── model/ # Proxies, VOs
│ ├── view/ # Mediators, UI Components
│ ├── constants/ # ApplicationConstants
│ └── Main.java # 程式入口